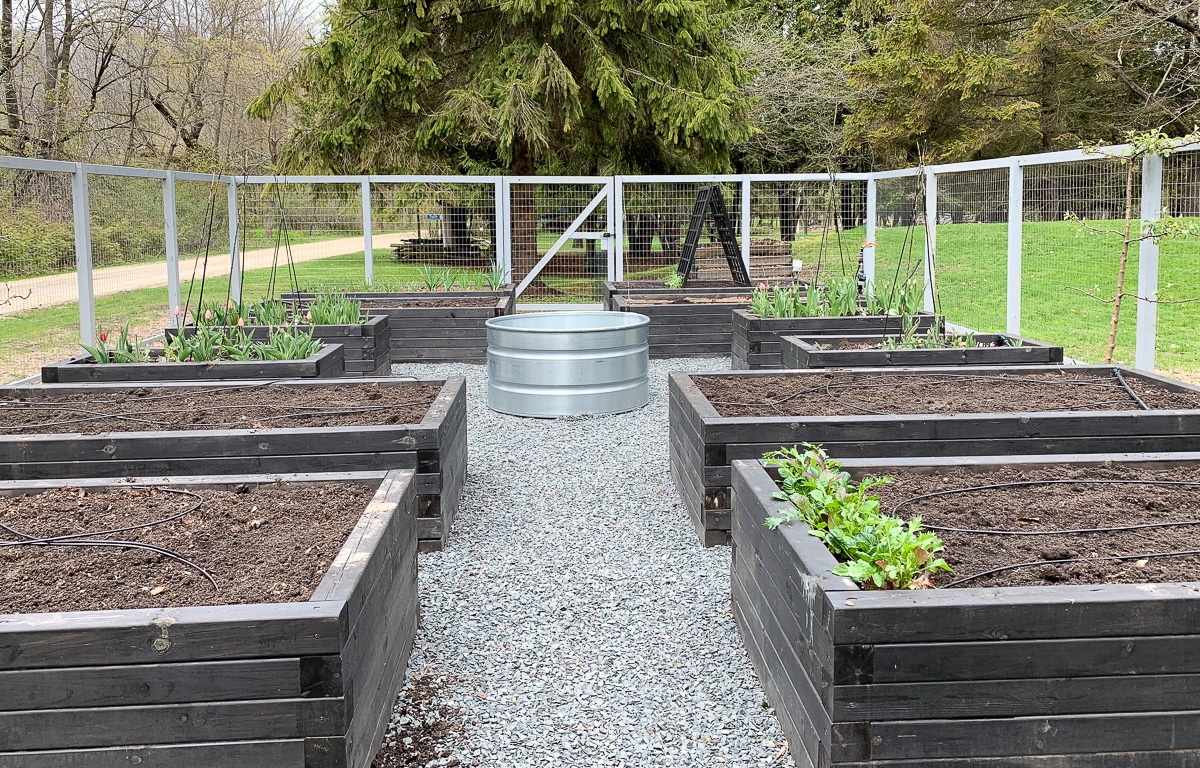
It feels odd to “reveal” a space that’s been unfolding in front of your eyes on this blog for a year now, but the vegetable garden is finally at a place where almost everything but the gardening bit is finished.
I can’t tell you how thrilled I am to be left only with the task of planting in this beautiful space. Like just about every project I do, I underestimated the time it would take to create this area. I was only off by about a year. I seriously thought it would look like this last year at this time. In fact, a year ago it looked more like this.
My friend Eric over on Gardenfork has a saying: “Done is better than perfect.” It is a fabulous motto and one I ought to embrace more in my life, but this whole project was driven by seeking perfection. Any non-perfect bits you see are a reflection of just being too exhausted to get it there, rather than a conscious decision to stop striving for the vision that’s been in my head for years.
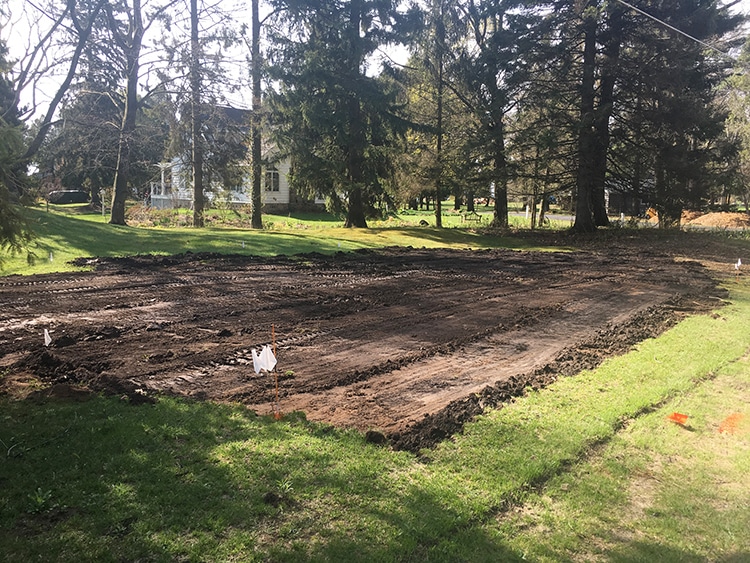
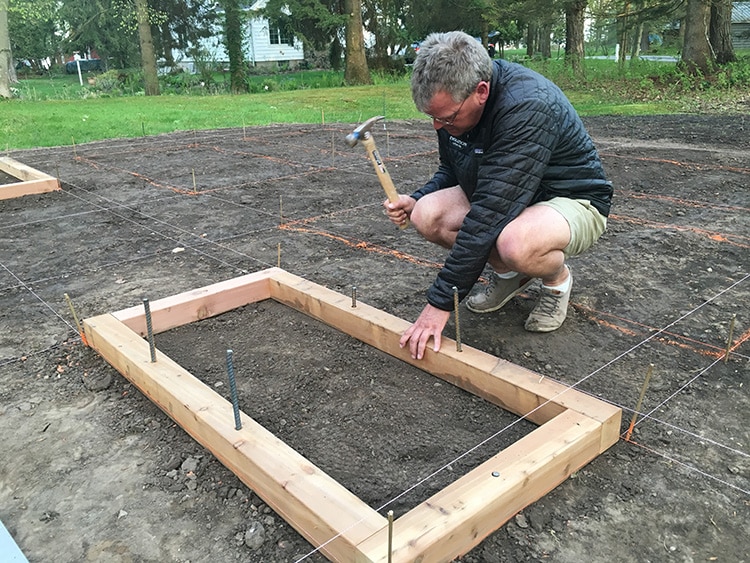
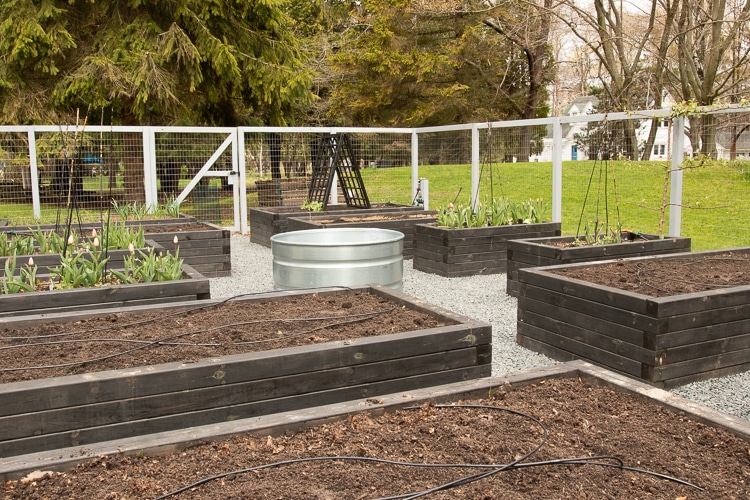
You already know the story of most of this space. We started by having the area leveled, then laid out the beds with an exhaustive series of measurements and a web of line (that we tripped over 1,000 times minimum). Unlike almost any other space in my garden or my life, it was all about symmetry. Then we built 12 sturdy garden beds. Then they were protected with a wood stabilizer and stained.
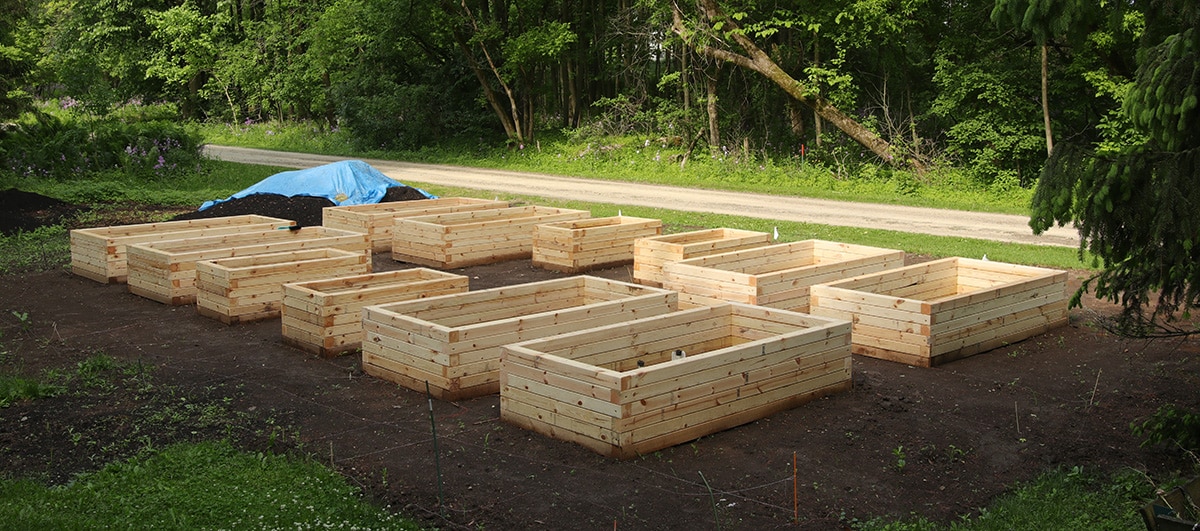
I was able to plant in the beds last year, but the space was not nice to be in. The ground was still mud, and a bunch of line stretched between poles served as a temporary (although incredibly effective) deer fence.

We had the landscaper who had leveled the area come back and dig out the dirt between the beds after we tried for a day to do it ourselves and made very little progress. From there we laid down compacted paver base followed by decorative stone chips.
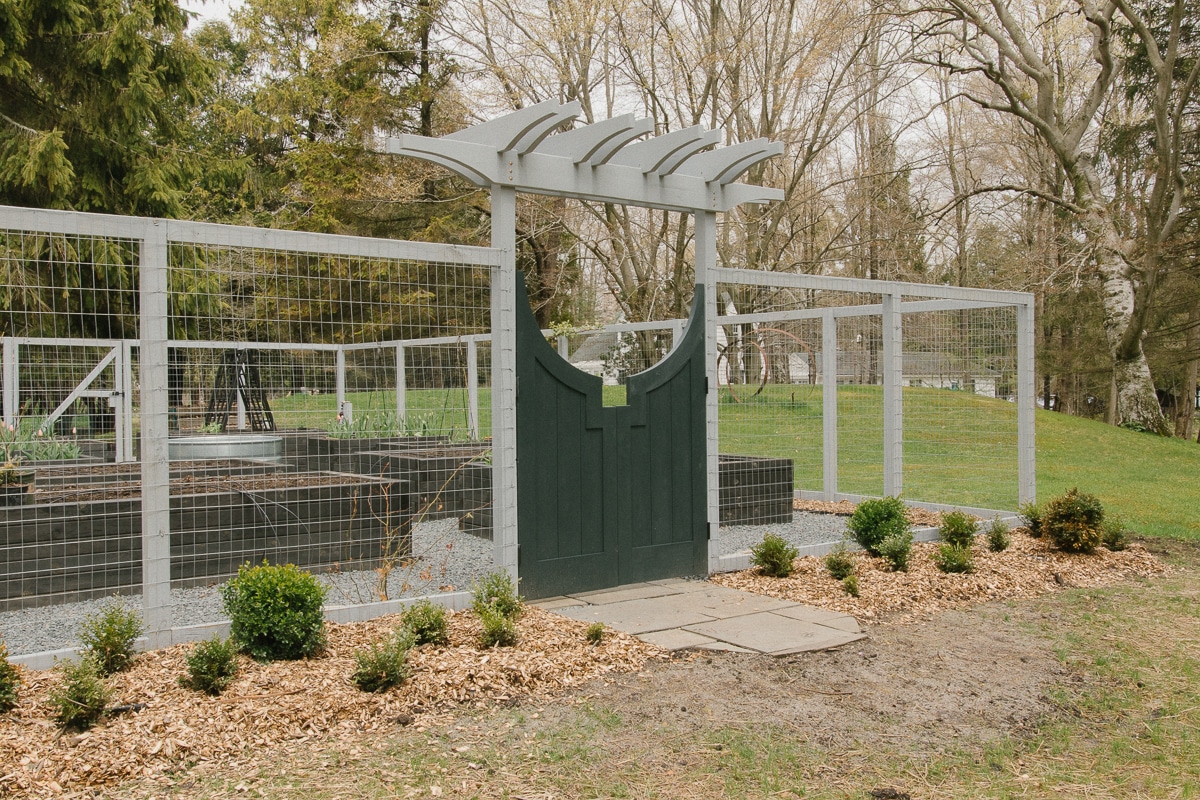
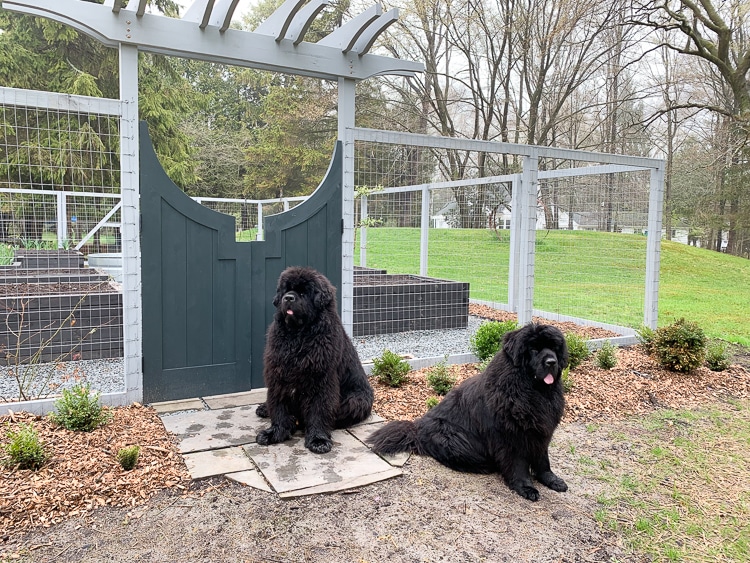
It wasn’t until December that the fence was constructed. (And since it wasn’t quite right, it was fixed this spring.) In January we built an arbor for the entrance.
This spring was spent hemming and hawing about what color to paint the custom gate, and, within the last two weeks we stained the rest of the fence and painted and hung the gate. I also created a small entranceway with reclaimed bluestone (here’s a video I did on that process).
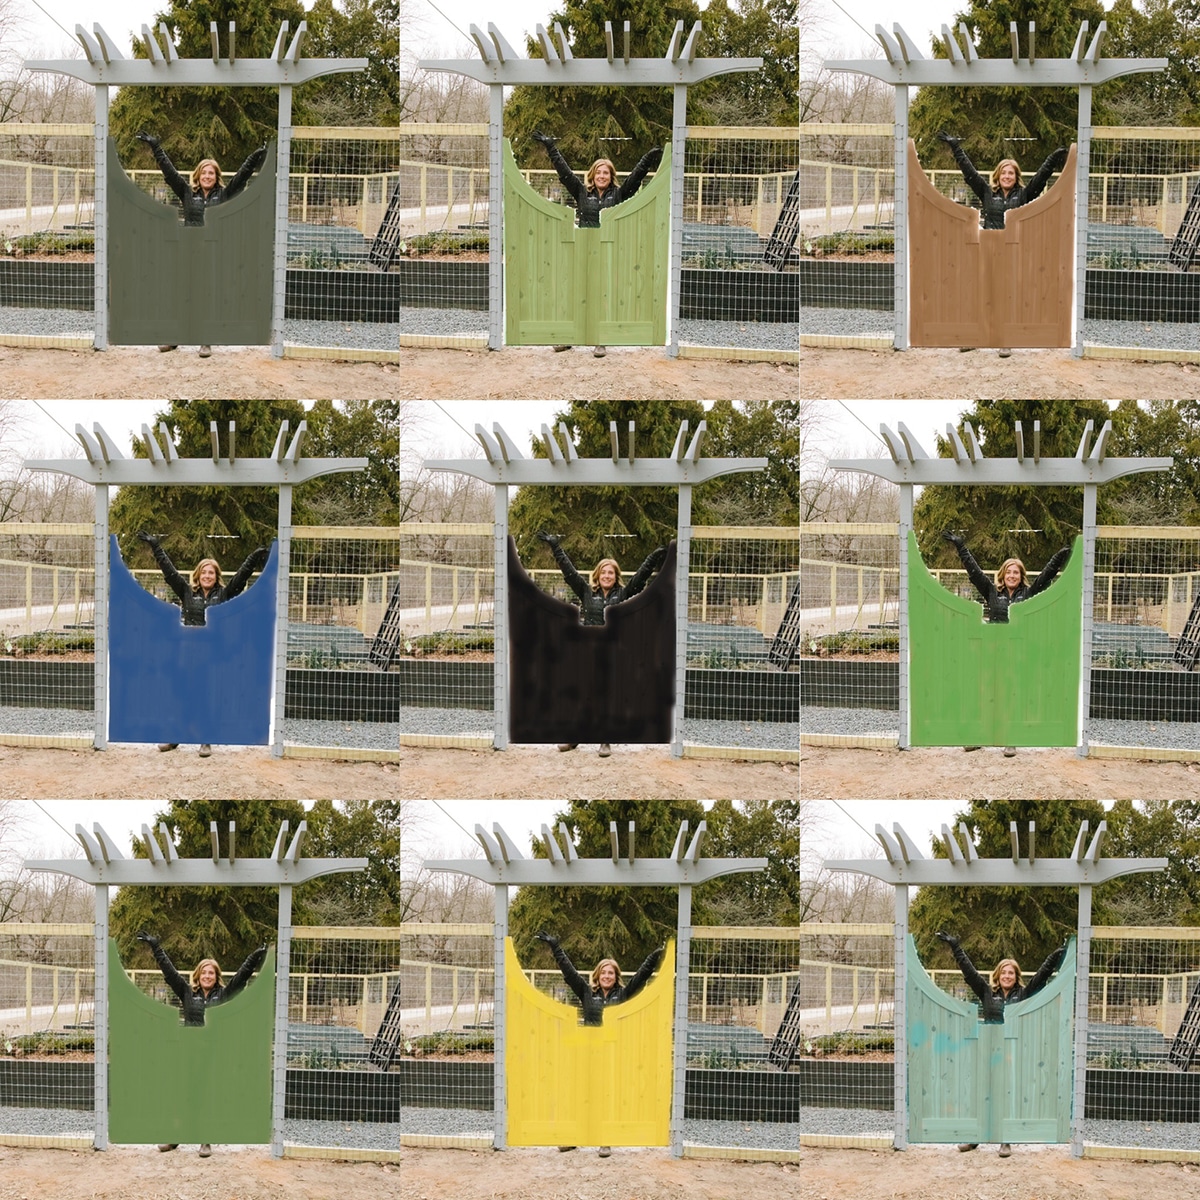
We should probably pause here to make a note of the gate color since many people were so generous in sharing their ideas about it. I ended up going with Valspar’s Nocturnal Green after seeing it on Jenny Komenda’s flip. It’s a deep, dark green, just a hair away from black, with a nod towards a dark teal. Once the ‘Crown Princess Margareta’ roses planted at the entrance grow a bit, I think it will all come together very nicely.
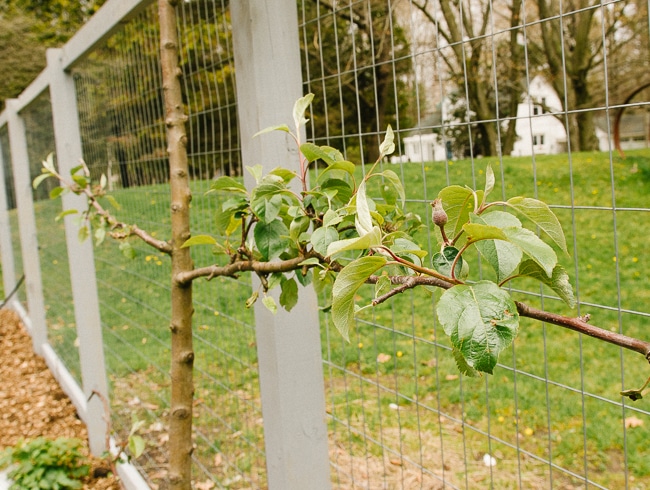
I’ve since started planting in the in-ground fruit beds that extend along each side. Again symmetry is the name of the game, so everything is repeated on each side. One side is now home to a ‘Liberty’ apple (chosen for its disease resistance), and the other has a ‘Bartlet’ pear (suggested as the best pollinator for the Asian pear we have by the chimney). I’ve also planted dwarf thornless raspberries and the start of espalier currants (thanks to Lee Reich) for the idea.
I’ll be planting ground cherries here for the first time and possibly strawberries. I’ve got future plans for the beds at the back of the garden but for now they are just mulched.
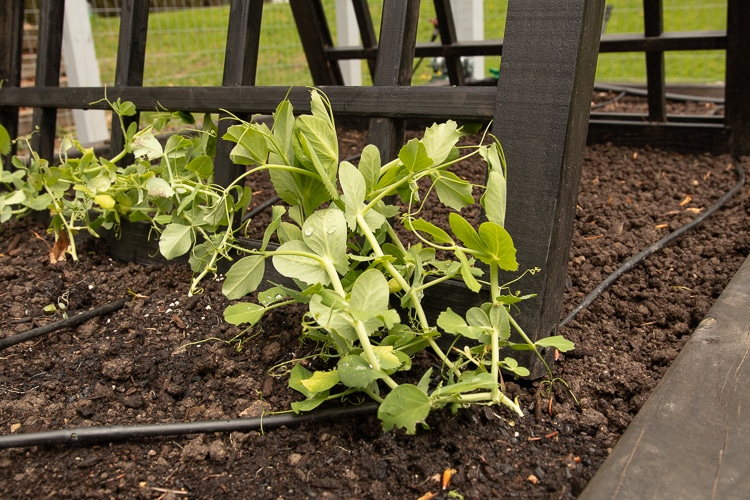
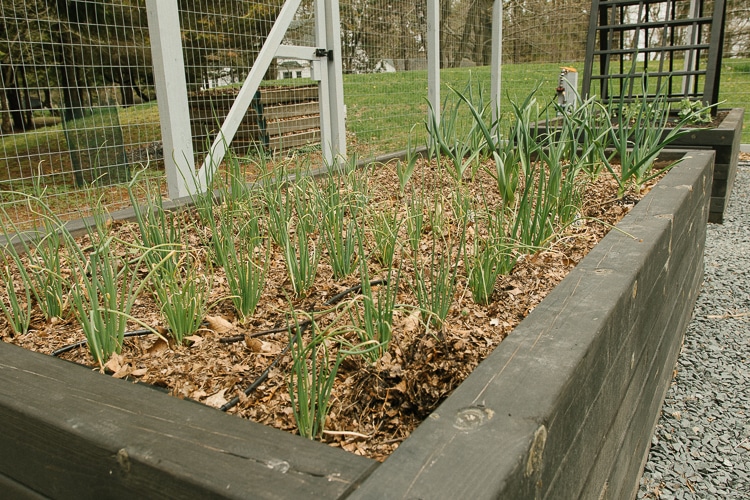
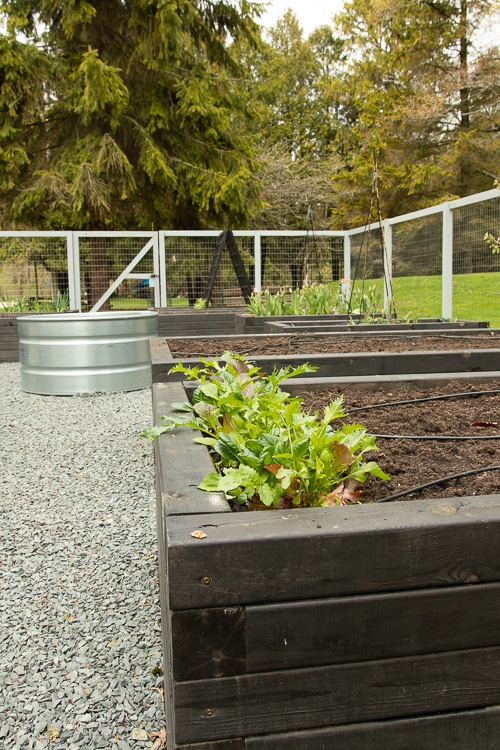
I had to top up the soil in (most of) the beds; it never ceases to amaze me how much soil in raised beds compresses in the first few years. And, other than the few things already growing: garlic planted in fall, onions grown from seed, a mesclun mix, peas and tulips and sweet peas in the flower beds, I officially have a blank slate.
In other words, all that’s left is the planting.
Included in that planting plan is the stock tank in the center where I’ll be attempting a container pond. I have no real idea what I’m doing. Hijinx will undoubtedly ensue.
I can’t wait to take you along on the journey.
50 Responses
Your garden fence has become the inspiration for my own garden which needs to keep rabbits, chickens and the random deer out. It’s great to have a visual to go from and this is fabulous.
I just emailed you and put the wrong email address re re potting dahlias and glads . How much water do they need.
Thanks Darlene
A week ago I re-potted my glads and dahlias to get a better start on our short growing season as we live in a colder climate Manitoba .
How much water do they need start growing. I value your input.
Your house and surrounding areas are just so beautiful.
Erin, I really appreciate the blog! I am currently moving away from a hydroponic set up to dirt! I have 10 beds that are 5×8 and am considering dropping that down to 7 beds. Any commentary on that is welcome. My actual question is how you feel about using 4×4’s vs 6×6’s? Also, I noticed yours are looking like they are 24” tall. Do you like the extra height or would I be just fine at 18”?
Thanks again for this wonderful blog – Luke
Hi, Erin! The mister and I are planning on building an enclosed vegetable garden this spring/summer and I am wondering what the dimensions of yours are. I went through the comments and didn’t see anyone ask. If this is repetitive, I apologize. Love, love, love your garden!
I would love to know if you won the deer battle with the veggie garden. Did this work over the last growing season?
Absolutely beautiful and I am green with envy. Would love to know how much harvest you get?
Absolutely beautiful! I have a question about the irrigation system too. Are there main lines to each bed buried? Or do you connect a garden hose and rotate through the garden?
Wowzers! This is so incredible! I loved how it turned out. Love following you on Instagram also. Thanks for sharing you knowledge.
Is the an irrigation system you especially like? I have to get a small area covered to grow some shrubs in very sandy soil.
Erin, your veggie garden looks amazing!
It’s gorgeous and I’m so jealous 😀
I love the concept of “done is better than perfect” but I find it hard to do that. The finished garden is absolutely stunning. Worth all the time, effort and money. You should see if you could write it up for Fine Gardening magazine or someone. It’s too beautiful not to share the story with other gardeners. I’ve seen similar things but they are always in the gardens of rich people who’ve had the whole thing done for them. So inspirational to know that we can do it ourselves. Well, you can!!
the wood posts on that garden would cost something, and the landscaper would cost something. i’d like to know how much it did cost her. including the spare gallons of paint.
Love the gate. Can’t wait to see your garden bursting this summer!
I go by the saying, “better late than never.” Though at some point I give up on perfection and realize it’s still taking just as long.
Just WOW
Love your garden, and that Arbor is fabulous, it makes the whole area look regal.
Also can’t forget to mention how cute and fluffy your pups are! : )
It looks great. Happy Planting!!
My first time commenting, but I am thrilled and so happy for you with how it came out! You worked so hard and deserve to enjoy the planting part!
Thank you Theresa, that’s so sweet of you.
Nicely done! It’s very beautiful, and I look forward to seeing it planted, and further progress of the trees/shrubs.
I look forward to seeing it planted too! 🙂
Love the gate color! The CPM rose will be so pretty contrasting it. Can’t wait to see updates later this season.
I can’t wait for those roses to do their thing. I hope they love their new homes.
Oh my gosh what a fabulous vegetable garden!!!! My house came with a veggie garden, but it’s on a slope and crooked and we’ve had to rebuild it already because the beds were rotting….it’s a work in progress every single year but I do love it!! Have fun planting yours, you must be beyond pleased with how this turned out!!
Absolutely gorgeous! The little details – stone chips, arbor, funky gate – just take it to the next level!
Thank you, Caroline!
All I can say is WOW!
Thanks, Helen!
That came together amazingly! Very gorgeous! I’ll be curious how weeds do in your path.
I will be too! I’ve used this method in a few other places and my experience has been that it does pretty well for about three years and then a few weeds start showing up. I hit them with the weed torch when they are little and that seems to handle it well. One possibly issue, though, is that I used larger stone chips in the garden (3/4″ vs. 1/4″) and I’m finding it harder to blow soil (as noted by the mess near one of the beds), pine needles and other organic material out because the crevices are larger. So that may be an issue.
Did you lay down landscape fabric first? I’m in the same boat as you. I want a brick pathway but definitely can’t afford it. Mulch would be easier but doesn’t give me the look I’m going for. After a full summer with the stone chips, do you still like it?
The gate and the entire garden is gorgeous. I haven’t been following the blog very long, but do you ever share info about budgeting and cost?
When I started this garden I did a very informal poll here asking if people were interested in the budget and the answer was mostly no, but I’m happy to share in general terms (general only because I long since stopped keeping track). I will say it probably ended up costing about three times as much as I expected, partly because I didn’t do a true budget in the beginning (i.e., I didn’t get fence quotes, I just guess at what a fence would cost and I guessed way wrong).
It is worth all the time and effort. I think you have attained the perfection you wanted. I like the color of the gate, especially in the close up photo where you can see the color. Now I can’t wait to see all the veggies and fruits of your labor..
Thank you so much, Lisa! I really have to up my veggie growing game now!
OMG. This isn’t a garden, this is a piece of art!!! WTG
Thanks, friend.
Absolutely beautiful! You guys did a fantastic job!
Thank you, Kim!
I love it! I was having trouble choosing between black and green, so this is beautiful! Sooooo envious of all of your sunny space, and looking forward to following along as you garden.
Thank you so much, Kristin. If could have you all over for a cocktail in the veg garden I would!
I love how it turned out…….well worth the wait and the color of the gate is perfect! It compliments the fence and will really set off your roses when they bloom.
Thank you! 🙂
Love it! Awesome job and the gate is beautiful.
Thanks, Becky!
I have fallen in love with your gardern. A small space can be made spoton. The veg beds ,the fruit sight to mention the few wow… that’s wonderful. Keep up the good job. Your fencing designs execllent.