Sometimes what we picture in our heads for our garden is not how reality works out. That’s the case with a little project I’ve been working on but I have faith it will improve.
This spot in the main garden off the patio is the closest thing I have to controversial area. Some of you feel very strongly about this spot in my garden (and not necessarily in a favorable way). You know that I’m always advocating that you should do whatever you love in your own garden, but I appreciate hearing what others think of mine or what they would do if they were in charge.
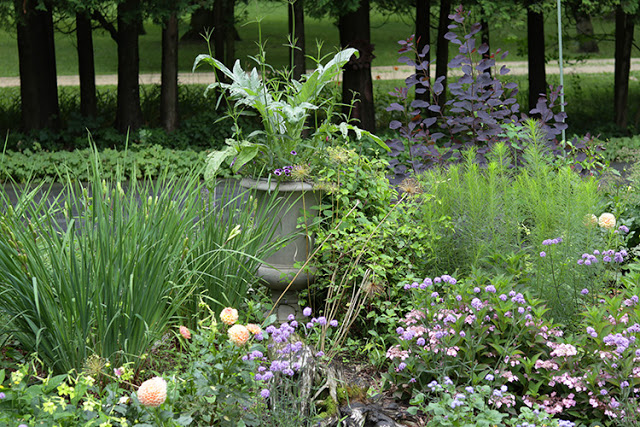
One such conversation (that even got a little prickly on Facebook when someone told me it just looked like a bunch of weeds; ouch), involved the urn I have in the middle of the garden. I love having a planter in this spot. In fact I love planters tucked in borders as a rule, even though I have used this technique only rarely in my own garden. But it has been a challenge to get just right. It gets enveloped by the shrubs, perennials and vines around it and the whole effect is somewhat chaotic. Lots of suggestions for how to improve the situation, including choosing a bolder container for the area, were offered.
It just so happens that the urn in that location started crumbling a couple years ago and there was a real chance it might not make it through another year. That was all the excuse I needed to go on a hunt for a larger container that would allow for a bolder planting scheme.
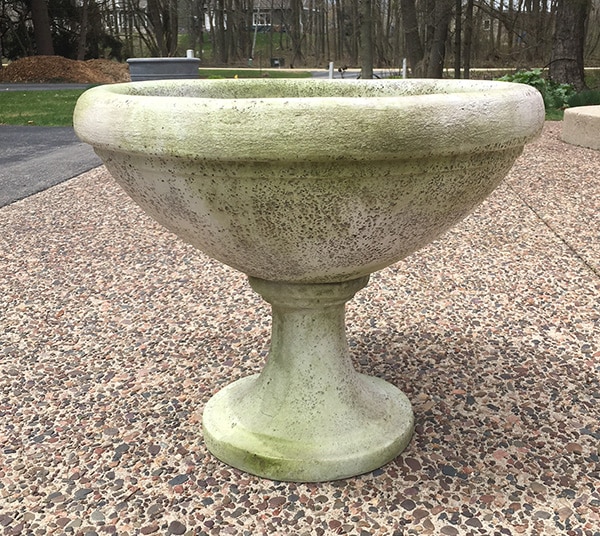
I have odd luck with container purchases. I get an idea in my head for what I want, search high and low to no avail then buy something else, only to see exactly what I want on the market a year or so later. I’m no trendsetter so there has to be another explanation for this, but it forces me to get creative. In this case I found this urn in the wrong color and decided to fashion a way to make it work.

Changing the color of a container is not new. In fact I did it quite successfully with a pair of pots from the Restoration Hardware outlet last year. Although I followed the same process of lightly sanding, cleaning and staining, this urn is fiberstone, so it didn’t take the color quite as well as last year’s containers did. Still, two coats got it to the right color and now all that remains to be seen is how well it holds that color.
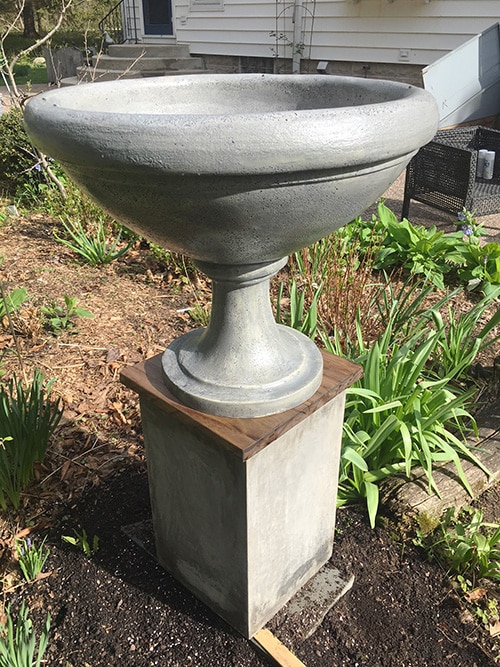
Then I needed a plinth to plunk it on. Target has really upped its container game (although they are all too small!), and this tall cement container was simple and perfect for the job. I topped it with a wood platform made from a cheap wood round I got at the big box store after I stained it and coated it in a lot of polyurethane.
And here’s the result.

OK, I’ll be the first to say that looks pretty awful. Ridiculous even. It is not the great unveiling I had hoped for. But here’s why I still have faith that in the end this will look pretty good:
- The plants in this bed are relatively tall. Soon they will be obscuring most the plinth and a good part of the urn.
- I’ll be filling the urn with a lot of trailing plants so I don’t expect much of the urn to be visible by mid summer.
- Once the nearby Limelight hydrangea nearby is growing, the height will start to make more sense.
Or, it could go the other way and look terrible. Or maybe it will fall over. But I don’t think it will. Sometimes you just have to have a little faith.
17 Responses
Great size and scale and yes, it’s still too early in the season to judge it. What about trailing planrs and a big leaved Hosta to contrast with the beds?
Trailing plants for sure! The hosta is a good idea too, although now I’ve already planted it so it’s one I’ll have to save for the future.
I love urns and the bigger the better. I use a lot of containers to fill in empty places in the garden and like that I change the plantings with the seasons. We just tore out some really ugly low growing cedars and I just had the stumps ground out. Really ugly right now but I need to take some time to plan .Company coming today for lunch but they are such good friends they won’t be critical. My bigger problem is forecasted rain when I had planned outside dining. Oh well always something.
Why is it that THAT Is when it rains? Seems to happen more times than not. Nice to have good friends who look past the not-so-perfect things.
I LOVE IT!!!! Question….in winter it would look a whole lot different than when it’s full of beautiful planting’s….do you bring it indoors or are you leaving it there? It would be quite heavy filled with soil…just curious….I enjoy your blog immensely it’s so helpful.
My thought is that I’ll leave it there and fill it with all the usual holiday pot filling stuff. It’s weather proof so that won’t be a factor, but we’ll see how it does this summer first.
I did not hear about the controversy. I love your new urn. The paint color will make the urn more subtle once the plants grow up around it. Might I suggest (although I’m sure you have already considered this), repeat the color of the trailing urn plants/flowers at least twice in the surrounding garden? I feel this would help integrate the urn into the garden area, and provide a pleasant vehicle for encouraging the eye to take in the garden as a whole, with mild emphasis on the urn as a surprise “pop” element.
Gardens like this are how we learn how to create something interesting. It really doesn’t matter what other people think. I have one of these…it’s my earliest garden….that now has the best soil….but is also my messiest and least coherent garden. But it’s also the one that has gone through the most experimentation, has taught me a ton, and it has some REALLY lovely moments. We’re in one of those peak moments right now with catmint bouncing off the big leaves of my comfrey and I just love it. And then in a few weeks it’s going to shift into something I still don’t quite understand. But I’ll figure it out and learn something along the way.
Well put! That is how it works, isn’t it?
I agree with Lisa at Greenbow about the concrete pavers. ($1.66 at Home Depot for the smaller size. I was there today looking for one for myself.) I would add putting one on top of the plinth as well. It will be better in the elements than the wood and look more of a piece with the urn now that you’ve painted it. I think it would look fine if it was a little larger than the width of the plinth. Might have to look into those plinths from Target for myself. Who knew they had them. Thanks for finding them.
Yep … good call! Thanks!
People will say anything that is for sure. I like your new urn. I didn’t know there was controversy about this bed. I thought it well made up. I guess if you like formality you might not like it but hey, it is your garden. I will tell you a little tip I have found to me most useful, especially when you have one of those tall skinny plinths. You put one of those cheap concrete pavers under it. You level the paver and it will keep the plinth/urn from tipping over for some time. They come in 12″ and 16″ squares, so one is bound to fit. They completely disappear in all the foliage or you can even throw mulch over the pavers and the disappear. Can’t wait to see what is going into the urn. I am sure it will be pretty.
I actually have it set on some bluestone pavers I had but about halfway through making that wood top I had that thought about using a concrete paver instead. It’s a good idea and I’ll probably switch to that sooner than later.
I love it! For real. It looks stately. The first thing I thought was, “when it fills it, it will be stunning.” I like the shape of this urn better too. Might sound funny, but there seem to be a lot of pointy leaves so the roundness of the urn is a nice counterweight. So that’s my 2 cents. And like you said, it’s an ongoing experiment right?
PS~ thank you for the source for the urn 🙂
Thank you! Ad you’re right about the pointy leaves. I hadn’t though of that but I agree.