In a very random Instagram moment over the weekend—a hastily shot story made while practically running past the compost as I dashed around trying to get a few jobs done before it rained—I showed an exciting compost-related development: a second bin!
OK, very few things related to compost can possibly be classified as exciting, but it’s the small things, right?
What I wasn’t expecting was a mini flood of questions about my compost system and composting in general, so I thought I’d just cover it all here in a quick-and-dirty compost basics post.
Compost is decomposed organic material. It is an excellent soil amendment for lightening heavy soil and for adding much needed organic matter. And it’s easy to make.
To be honest, nature takes care of the composting. Everything we do just helps the process go quicker so we can make use of it sooner.
COMPOSTING SYSTEMS
The simplest composting system is a pile. That’s really all you need. But you can contain compost or pretty it up by using some sort of bin system.
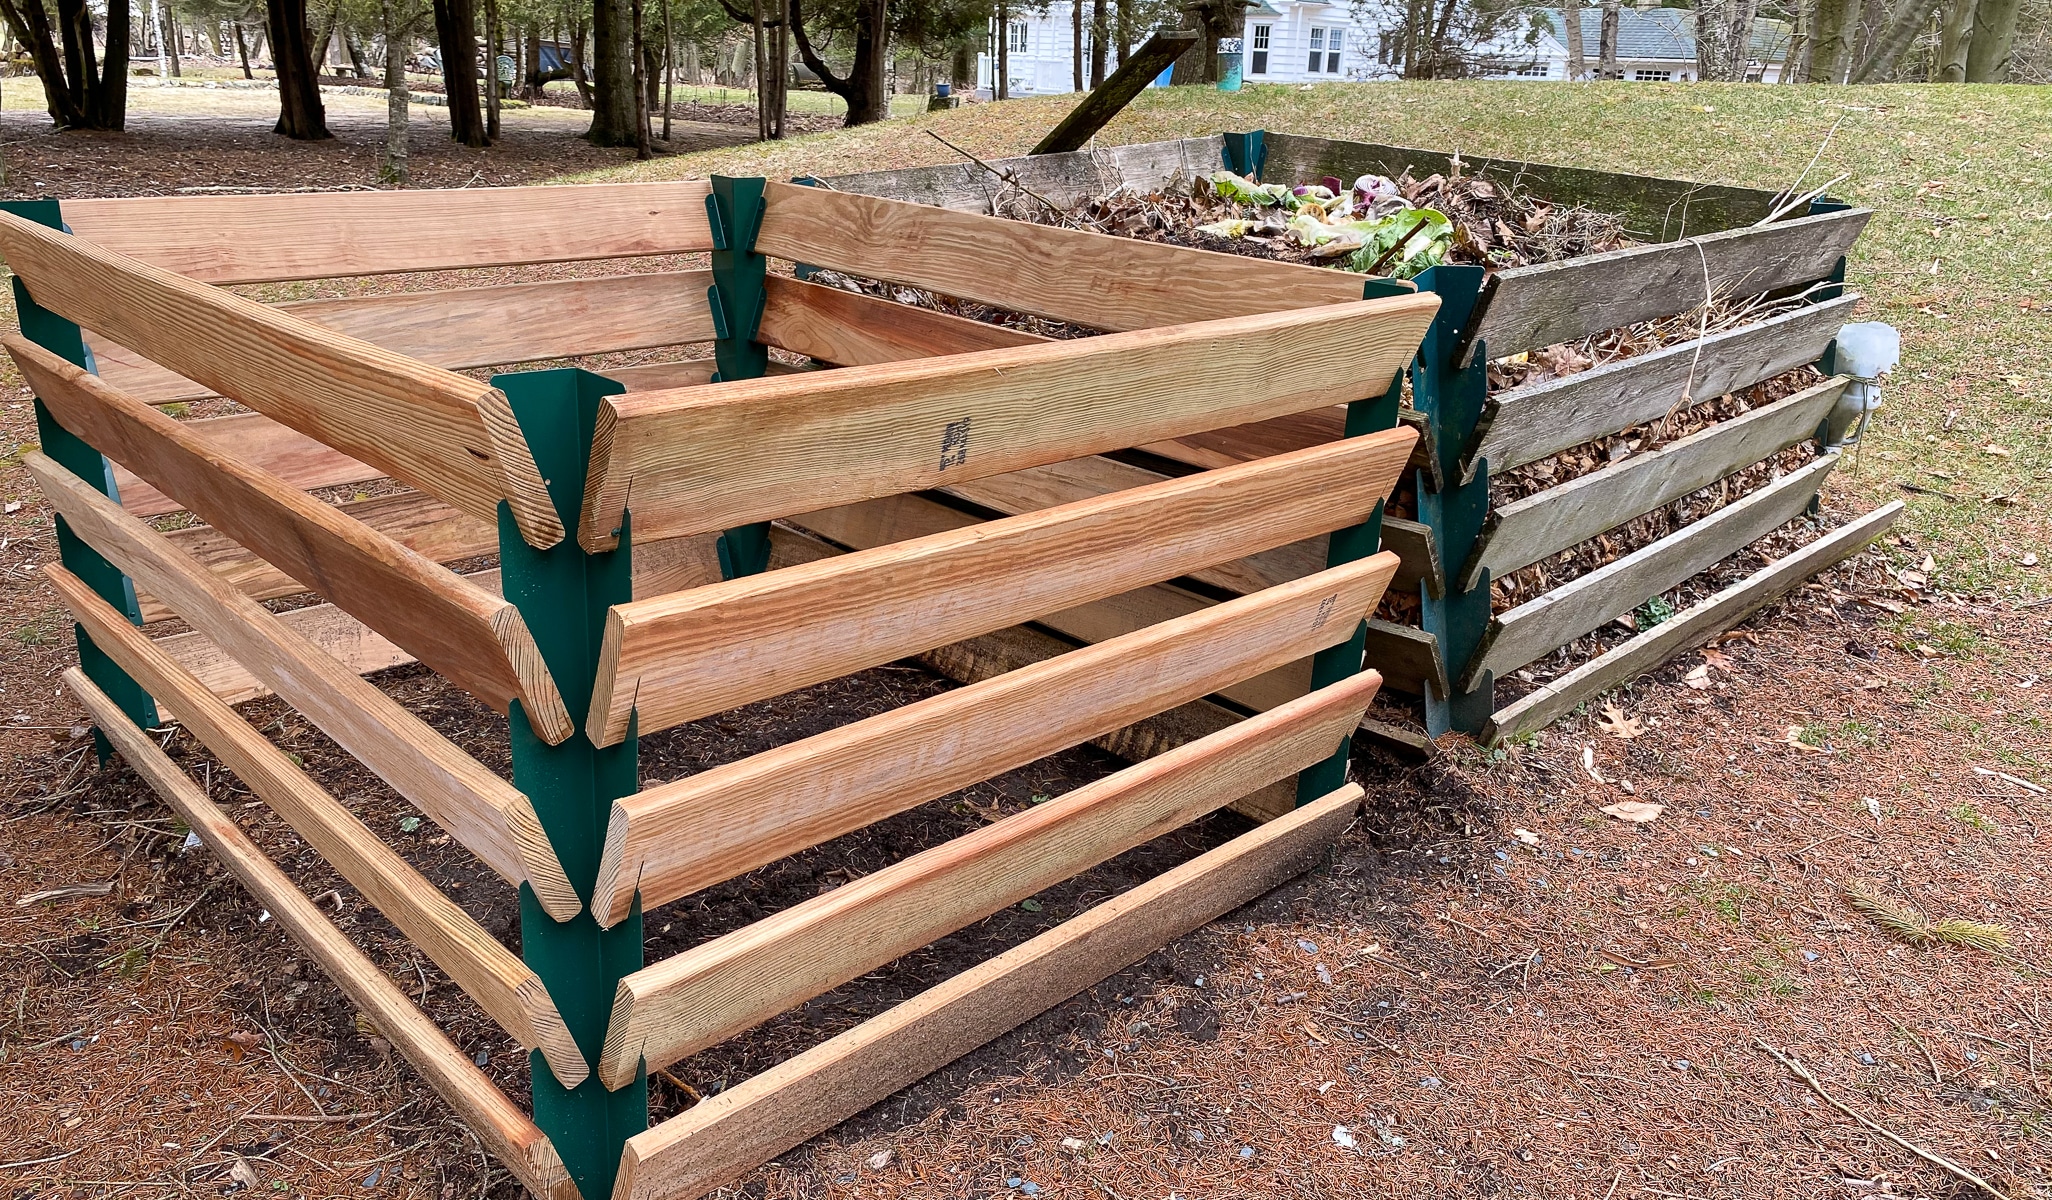
Creating a bin, or a series of bays, helps contain the pile and may make it look a little nicer. An ideal system for a home composter would probably be a three-bay system in which the first bin gets the raw material, which is then turned into the next bin and then into the next bin for finishing and storage until it’s used.
Like a lot of people, I don’t have room that kind of system (or maybe I should say I choose not to make the room for it), so for years I’ve just had one “bay.” Originally I made it out of pallets, which convenient and usually free, but you are limited by the size of the pallets.
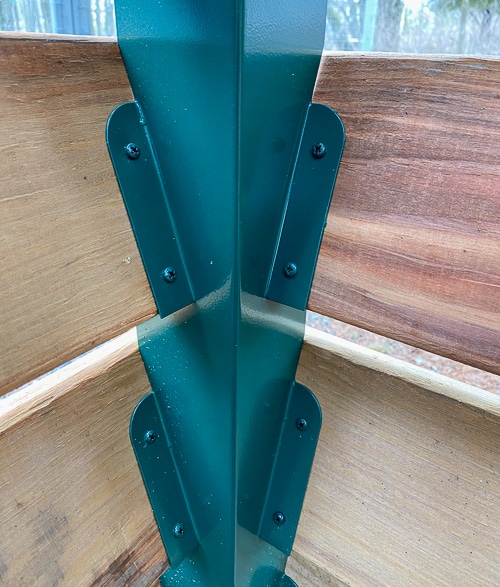
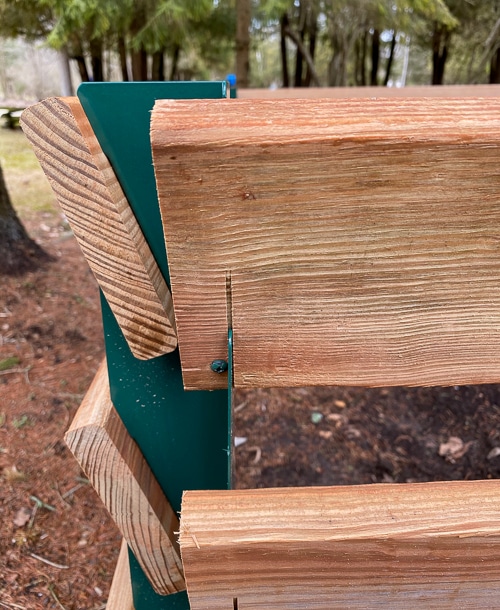
About 10 years ago I got these composter brackets and created a 5-foot square bin, which moved several times before landing at what is now the back of the vegetable garden. Last week I bought as second set of brackets so I can have a second bin, which will allow me to make more compost.
There are also compost barrels that can be turned to quickly create a small amount of compost. These also have the advantage of ensuring that no critters will get into your compost.
You can also simply dig a hole and compost in place in your garden, or create a sunken “bin” by digging a hole in the ground.
Hopefully you get the idea that there are a lot of ways to get to the end goal.
HOW TO MAKE COMPOST
No matter what kind of system you use, the ingredients to make compost are the same: carbon-rich “brown” material, nitrogen-rich “green” material, water and air.
A Google search for the ratio at which you should add browns to greens in a compost bin is anywhere between 2-to-1 and 30-to-1. I say, don’t stress about it too much. You should have more browns than greens. If the pile gets slimy, add more browns, if not much is happening, you probably need more greens.
If you’re using a bin, it’s helpful to alternate layers, but that’s not always possible (like in fall when it seems like it’s all brown).
You need moisture to get decomposition happening, so a good soaking so that the material is about as damp as a rung out sponge usually does it.
Air comes in by turning. I use a pitchfork and count it as my workout for the day. I probably only turn it three or four times a year.
WHAT TO PUT IN THE BIN
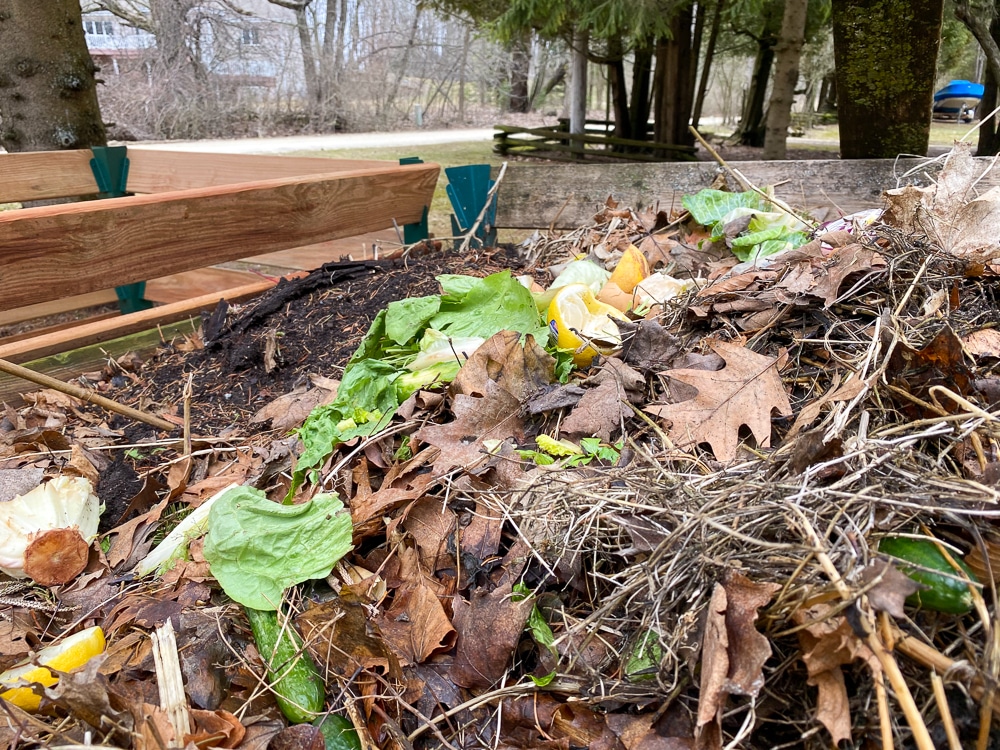
Here’s the big question: What are you supposed to put in there? Making lists is hard because it depends so much on what you have to work with. Under no circumstances should you ever have to purchase something to put in your compost. I know that sounds weird, but I’ve seen people talk about buying compost ingredients before and there’s just no need. You also don’t need purchased composed “starter” (or whatever they call it). A shovelful of soil from your garden will have all the microbes and bacteria bits you need.
You also don’t need to add worms. Worms and all the other things that make decomposition happen will find your compost if it’s sitting on the ground.
Browns:
- Leaves
- Straw
- Dead plant material
- Shredded newspaper, office paper or cardboard (avoid shiny paper from flyers, etc.)
- Coffee grounds
- Egg shells
Greens:
- Grass clippings
- Vegetable scraps from the kitchn
- Deadheaded flowers, pruned material or clippings
The smaller the material you put in, the faster it will break down. There’s no need to get high-maintenance about it (blending your kitchen scraps before you put then in the bin is not necessary), but if you run a lawn mower over your leaves before you throw them in, you’ll speed the process.
What not to put in:
- Meat
- Fats (or vegetables that have been cooked in fat)
- Weeds, possibly*
About those weeds: I am a little careful about weeds in my pile. If your pile gets hot, you’ll cook seeds or roots that could be problematic down the line, but a lot of smaller systems don’t get that hot. I typically try to avoid putting weeds in my pile, especially anything aggressive that is perennial.
I also used to avoid putting diseased plant material in my bin, but then I spoke with Lee Reich (and he knows composting) who told me has always put diseased material in with no problems.
VARMINTS AND GENERAL UNPLEASANTNESS
The No. 1 reason I hear from people who are reluctant to start composting is a concern about rodents and odors. Odors are easy: Your compost pile should never smell foul. If it does you should add more browns or give it a turn.
As for varmints, I have to say, I’ve never had a problem. Maybe I’m lucky, but it’s just not been an issue. Avoiding meats and fats will definitely help. Lee puts hardware cloth on the bottom of his bin to keep rodents from coming in so that’s an option too.
HOW DO YOU KNOW WHEN IT’S READY?
The beauty of compost is that it doesn’t demand a lot of attention. But it does demand some patience. It typically takes me about eight months to make compost, but because, up until now, I’ve had a one-bin systems, that’s not the entire bin.
I manage the one-bin system by pushing aside all the bits that are clearly not fully broken down, and then aim for the middle of the pile. This aerates the pile, but also helps me sift through to the finished compost.
Compost is finished when it is fluffy and dark and has a slightly sweet, earthy smell. If it smells at all unpleasant, it’s not finished. If you need very fine material, say to add to containers, you can put it through a sieve (half-inch hardware cloth stapled to a frame works pretty well). I usually just pull out bit, clearly not fully broken down material by hand. Usually I just add compost as a top dressing, so it will continue breaking down there.
You can dial in a compost operation to be a fine-tuned machine and watching the process unfold is truly fascinating. But you can also take it at your own speed and make it what you want.
My advice? Don’t get too caught up in the details and just start. Nature’s got your back.
13 Responses
I would want to be able to remove the entire front wall. Do the bracket slots hold enough of the wood to where they wouldn’t flop out, etc?
I have a black compost bin, which gets pretty hot because I just found the greatest compost tool. It’s a piece of metal with a sort of screw at the end. Everytime, I add to the bin, I screw the crank down and bring up a plug, which lets air into the middle. It works so well! You can now feel the heat coming off the compost and it’s breaking down so quickly! I think there’s several brands, but I like mine best because there’s no moving parts and so easy to use! I love it!
you are VERY lucky that you dont have rats/mice. a great solution for those who do have rodent vectors are these galvanized steel burn bins with lids. they have enough ventilation for compost, but holes are small enough to prevent rodents entering. also they are relatively cheap and made in minnesota.
We don’t have room any more for a beautiful system like yours. We just have a small composter and bag the rest and take it in truckloads to the city drop off where they deal with it. But that is closed now due to COVID-19 and so we are putting it all out front for the city to pick up when they collect spring yard waste. If they don’t take it soon, it is going to start composting.
Front yard composting is the newest thing! 🙂
I love my compost piles too. . My piles are just on the ground, so the one big problem is the roots that grow into the last yummy pile. I don’t have a very hot pile so I get plenty of avocado seedlings growing in the summer! Discovered this week that peanuts don’t seem to compost well which makes sense because they grow underground. As our Extension agent used to say….Compost Happens 🙂
I get a ton of avocado seedlings too!
Thank you for this! Have wanted to start but everything I’ve ever read seemed so complicated and intimidating
with ratios of browns to greens, timing, additives, etc. I will trust that nature knows what to do! Cheers!
Funny you should do a post about composting. I just looked at my bin yesterday and OMG – this is NOT compost, this is slimy vegetable matter – even saw some whole cranberries. Any recommendations on whether I should dump the whole thing and try to start over or is this salvageable ?
Jean didn’t give up! I’d sprinkle some dirt from your garden if you can spare it. The microbes in the soil help the process. Sometimes I’ve had things appear to persist for a remarkably long time in ours!
Do you do anything for winter maintenance? Does it freeze solid? (I am in 4b.) Can you add scraps on the top of it in the winter?
I was thinking about doing this, so your post is perfect timing! Thanks.
I completely understand your excitement over the new compost bin! Hubby built me a 2 bin one for my birthday and my non gardening friends were puzzled by my joy of such a gift. I am relieved to hear that you seldom turn your pile, I rarely ever do and now I can let go of the guilt. I would be interested to know how you manage your kitchen scraps. I keep a small enamel bucket in my fridge which keeps it from getting smelly.