• Home
  • ABOUT
  • VIDEOS
  • Contact
  • SHOP

The Impatient Gardener

Garden

THE POTATO TOWER EXPERIMENT

May 5, 2014

I grew potatoes for the first time last year at one of the community garden plots my mom and I share. Despite the fact that I had no clue what I was doing and the soil in the new plot was very, very poor, we got a small but delicious crop of fingerling potatoes. The harvest was that much more appreciated since I’ve been trying to avoid non-organic mass-produced potatoes ever since I read “The Botany of Desire.” Great, interesting book by the way, but not recommended if you want to keep eating the reasonably priced potatoes at the store.Last year’s success was enough to make me give it a go this year. The problem with potatoes is that they take up a fair amount of space in the garden and they are prone to disease, which makes moving them every year, important. Complicating the issue is that they can pass illness to their cousin the tomato, so you have to avoid rotating them with tomatoes as well.

I’ve been intrigued with some of less traditional ways of growing potatoes, including in grow bags and even garbage bags. But to me, the potato tower idea made more sense.

There are several methods for creating a potato tower. I read about a lot of them, including several on Pinterest and one from Fine Gardening magazine, and came up with an amalgamation.

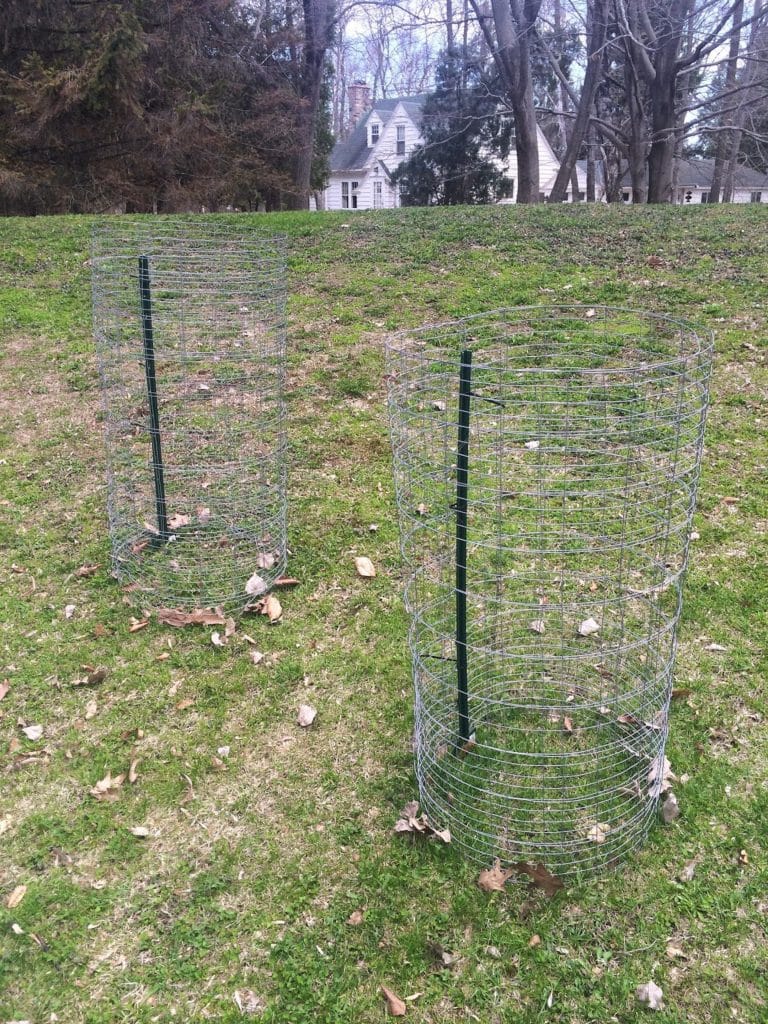
I started with a metal fence support, just the green kind that you pound in to the ground. Then I used plastic wire ties (aka zip ties) to attach a circle of fencing to the post. The instructions I read all used different types of fencing. I avoided hardwire cloth, which typical has half-inch squares because it seemed like that would be hard for stems and leaves to sneak through. Instead, I bought rabbit fencing, which has 1-inch by 4-inch holes on the bottom and 4-inch square holes on the top. I did a double layer of fencing, flipping the bottom to the top on the second layer, just so the holes weren’t so large.

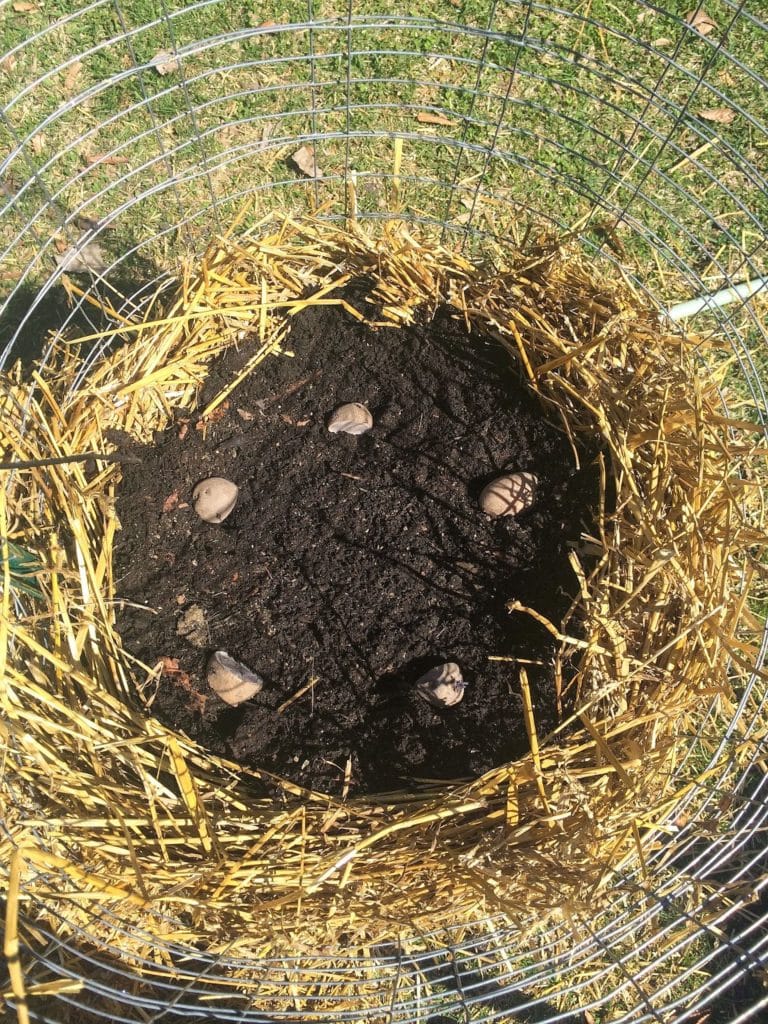
The sprouts or eyes on the potatoes faced outward. Some layers got three potates, but then I was running out of room, so I put a few more in on upper layers.

Then I started the layering. I did four layers in each of my two towers. Each layer is constructed by putting down a bed of straw and lining the edges with about a 2- or 3-inch thickness of straw, then putting in a “core” of soil in the middle. For the soil, I used a combination of purchased top soil and mushroom compost or leaf compost. On the soil layer, I threw in about 4 or 5 inches of blended soil, then put in the seed potatoes, a few inches in from the edges with the eyes or sprouts facing outward. I covered it with an equal amount of soil and watered it thoroughly. That completes a layer.

Then I just repeated that process in each tower. Since I was doing two towers, I found it easier to do a layer in each tower before moving onto the next tower. The key is to keep the straw on the outside packed pretty tight to keep the soil in and the light out.

When I got to the final layer, I left some room at the top of the tower to add more mulch as needed to continue covering the shoots. I also watered the entire tower really well. One of the negative comments about potato towers is that they dry out too much and it’s difficult to keep the potatoes properly watered, so I intend to keep a close watch on that.

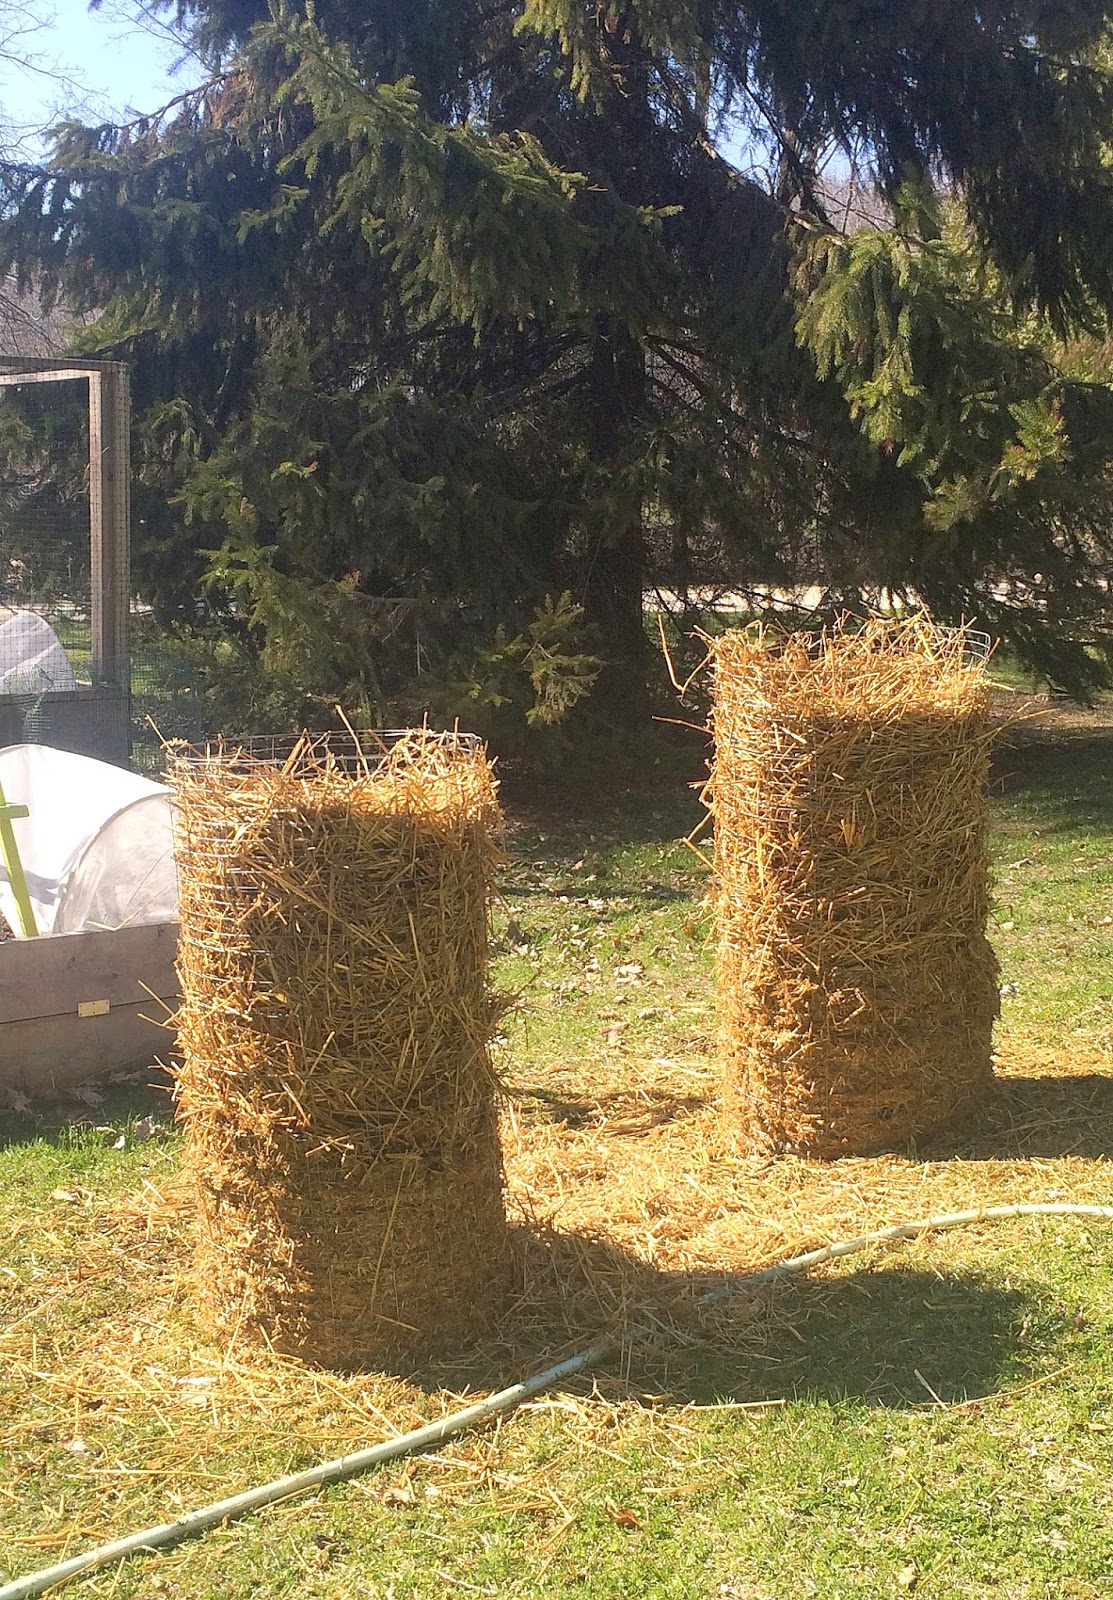
You can see that things got a little messy and I’ll need to do a little raking. The chopped straw was difficult to keep in, but I think it was nicer looking than the straw from bales, which is the top half of each tower.

If all goes well, the towers should be covered in leaves as the potatoes grow (which I sincerely hope because they are not the most attractive things) and when it’s time to harvest, I should be able to just knock the towers over, pull out the potatoes and compost everything else.

I’m willing to experiment a little to get some great potatoes, but I think it’s safe to say this is probably not one of those money-saving things. I had to buy everything for this project. Granted, I can reuse almost all of it in future years, but there was definitely an upfront cost. And obviously I didn’t need an entire roll of rabbit fencing, but I had to buy a whole roll to get what I needed so I’m including the entire roll cost in my tally.

So here’s the cost so far:

  • Metal stakes: $2.80 for two
  • Roll of rabbit fencing: $28
  • Straw (I had a bag of the chopped up stuff for seeding lawns plus purchased a bale): $1.50
  • Soil: $25 (approximate)
  • Potatoes: $25 from here (There are definitely less expensive potatoes, including organic, out there, but for various reasons that’s what I went with).
Grand total: $57.30
Let’s say organic potatoes cost $2.50/pound (I usually buy fingerlings which are more expensive). That means I need to produce about 22 pounds of potatoes to break even. We’ll see what the season holds, although I think it’s worth pointing out that I rarely grow my own food for economic reasons. The taste and satisfaction I get from growing food is generally worth whatever it costs.
Don’t worry, I’ll keep you updated on how the towers work out.

Interested in how this turned out? Check out the end-of-the-summer results here. 


potato tower vegetables
by Erin @ The Impatient Gardener 
9 Comments

About Erin @ The Impatient Gardener

View all posts by Erin @ The Impatient Gardener

Related Posts

  • romaine seed tapePlanting now for a quick fall harvest
  • Bio dome planting systemHow to start a whole garden in one tray
  • It’s not too late to start growing
  • Late season vegetable harvestThe first frost, the last harvest and a big project nearly complete
previous post: BLACK IS NOT BLACK
next post: A COMPOST CONUNDRUM

Comments

  1. Casa Mariposa says: May 5, 2014 at 6:36 pm

    This is really cool! I grow sweet potatoes in pots but have never grown regular potatoes. These will be beautiful when they are covered with foliage. Very cool idea! :o)

    Reply
  2. Jenny Hickson says: May 6, 2014 at 7:49 am

    I've heard of doing spuds in pots/bags but not come across these towers before – I'll be intrigued to see how you get on. Do you know how many seed potatoes you fitted in?

    Reply
    • Erin Schanen says: May 13, 2014 at 4:26 pm

      HI Jenny! It was a total of 3 pounds of seed potatoes. At least that's what I ordered. Some of them were loaded with eyes so I but them into pieces.

      Reply
  3. Heather - New House New Home says: May 6, 2014 at 11:36 am

    Good luck with this experiment! I've been wanting to try it, but I'll wait another year to see how you make out. Twenty-two pounds of potatoes sounds like a lot of potatoes. But really I don't think it should be hard to achieve that with two towers.

    Reply
    • Erin Schanen says: May 13, 2014 at 4:26 pm

      I don't know … I bet that is ambitious, but I'm willing to try almost anything at least once!

      Reply
  4. [email protected] Eye View says: May 6, 2014 at 10:21 pm

    I had not heard of this method. I use grow bags. After the initial investment, they have held up and produced loads of potatoes for me. We only grow the blue potatoes as they are loaded with antioxidants…and we also are organic…hard to find organic potatoes in the grocery store. I will watch how your towers progress with great interest.

    Reply
    • Erin Schanen says: May 13, 2014 at 4:27 pm

      I've heard great things about using grow bags. If this experiment fails maybe I'll try that next.

      Reply
  5. Renie says: May 13, 2014 at 6:36 pm

    This is really cool! Can't wait to see how it turns out. Organic potatoes are nearly $5 a pound and I love how easy the setup looks

    Reply
  6. Tina Puro-Douglas says: May 14, 2014 at 1:21 pm

    Hopefully you can now save your seed potatoes for next year! This is a fun idea and look like more work up front but maybe less in the long run what all of the digging in and up of potatoes. I am trying them in my garden this year as well. I have german butterball, fingerling, kennebec and the baby reds all organic that I bought from our local co-op. Are there any amendments you recommend for them?

    Reply

Leave Your Comments Cancel reply

Your email address will not be published. Required fields are marked *

This site uses Akismet to reduce spam. Learn how your comment data is processed.

About

The Impatient Gardener

Do you love gardening? Me too! I'm Erin and I garden in Southeastern Wisconsin, zone 5. The Impatient Gardener is all about real-life gardening: the good parts, the bad bits and even the funny stuff. It's part information, part inspiration and a little bit commiseration. Thanks for visiting.

Here's some more about me.

CONNECT

Awards

Garden Comm award

MY FAVORITE GEAR

https://www.amazon.com/shop/impatientgardener

Instagram

impatientgardener

E R I N 🌿 The Impatient Gardener
I had a rather unpleasant realization last night w I had a rather unpleasant realization last night when I remembered that I’d not yet ordered tomato seeds. And I’m not going to rectify that until I dig into my seed stash, because I don’t go through tomato seeds quickly so there are definitely some lurking down there. 

I never used to grow tomatoes from seed because there are great varieties to be had in garden centers (including many heirloom varieties). But it’s almost non-negotiable for me now that I’m a convert to dwarf tomatoes. If you’re not familiar with the #dwarftomatoproject championed by @nctomatoman and others, these are heirloom varieties that are crossed with dwarf varieties to create plant that produces all the flavor and interest of an heirloom in a short (usually less than 4 feet) plant. 

They are particularly great in my tall raised beds. Of course I leave room to try new non-dwarf varieties every year (I loved Sun Dipper from @panamseed last year and I’ll grow it again).

Last year was a good tomato year and the photo shows some of the varieties I harvested in one day. I hope this summer will be equally good for the tomato harvest. 

One of my favorite questions to ask gardeners is: What is your favorite tomato variety to grow? So have at it in the comments because inquiring minds want to know!
And this is why I leave my winter containers assem And this is why I leave my winter containers assembled until at least March. A dusting of snow gives them a whole new look (even if it’s shades of gray). Also, I think I love my Limelight hydrangea even more in winter. Fabulous winter interest!
I’m going to look for opportunities to add more I’m going to look for opportunities to add more ferns to my garden this year. They are such interesting plants and often real problem solvers, bringing texture and color to places that many plants aren’t interested in. Athyrium niponicum (Japanese painted fern) ‘Crested Surf’ grows well for me in part shade (even pushing a bit into part sun) and looks great next to Persicaria ‘Golden Arrow’.
Birds chirping, glorious fresh (i.e. not nibbled o Birds chirping, glorious fresh (i.e. not nibbled on) foliage, and texture galore. I can’t wait to have moments like this again. The star, by the way is Hakonechloa ‘All Gold’ which looks so good with the bold foliage of Ligularia dentata ‘Desdemona’ next to it. 

With the new path, this area will be getting a small revamp. It’s the next spot I’ll be focusing my planning on.
Load More Follow on Instagram

SEARCH

Popular posts

  • Three ways to grow annual poppies
  • Treat your pruners right with a spring spruce-up
  • Oh how I love a great garden path
  • 2 ways to plant dahlias

Find us on Facebook

Archives

  • ABOUT
  • TALK TO ME
  • TERMS & DISCLAIMERS
  • PRIVACY POLICY
  • Home

Copyright © 2023 · Prima Donna theme by Georgia Lou Studios

Copyright 2009-2021 ©The Impatient Gardener