I’m a bit obsessed with window boxes these days. I think they are so charming and can cure a multitude of house exterior sins. If I were selling a house, I think a window box would be right up there on the must-do list for curb appeal.
So, you might wonder, why am I just now putting a window box on my own house? I’ll be honest, I never even thought of it before. But then I was studying this drawing of the house (showing an exterior elevation of the house for some work we hope to do later in summer) and I was incredibly bothered by the fact that one of the windows is shorter than the others. It’s the kitchen window behind the sink, so it makes sense that it’s not as tall as the others, but from the outside it just looks wrong. Perfect spot for a window box! Once it’s installed and planted, I don’t think you’ll notice the shortness of it nearly as much. Plus, our house’s all-white exterior is a bit, um, boring, so a little color would go a long way.

I love looking for container inspiration, so I’ve been enjoying my hunt for great window box ideas. And even though I’ve never planted a window box, I know what I like and I can definitely tell what’s not quite right, just from studying photos of them. So here are a few design concepts to keep in mind if you’re going to be planting a window box.
1. The more window boxes you have, the simpler the design should be. Window boxes are great but they are, as Tim Gunn would say, “a lot of look.” If there are too many colors or textures going on, your house is going to look like the little shop of horrors. Keep your plant choices to one, maybe two or three at an absolute maximum (and then only if they relate closely to each other, such as a light pink and a dark pink petunia) and then plant every box the same. I know it’s hard to pick just a few plants when there are so many great ones around, but pick one or two this year then do something totally different next year. Just don’t do it all at the same time.

2. The higher your window boxes are, the simpler, and “bigger” the look should be. Euphorbia ‘Diamond Frost’ is a great container plant, but its fine texture will be completely lost in a window box mounted 15 feet in the air. Better to stick with a big, bold petunia or geranium.


3. Thriller, filler, spiller still applies … sort of. As with any container planting, you want to mix things up (unless you are going for a very contemporary look, in which case a line of plants all the same height—grasses grown in almost a hedge look, for example—might look very cool). The tallest plant should be in the middle and things should gradually decrease in size from there. Be careful, though, to to keep scale in mind. A very long window box with Papyrus ‘King Tut’ planted in the middle would look very odd (and make opening the windows very difficult.) Also, spillers should be consistent throughout the box. I saw some with spillers just on the ends and it looked quite strange. And as long as we’re talking about spillers …


4. Move away from the sweet potato vine. ‘Marguerite’ is a hungry girl. She will eat all the other plants in your container for lunch. Sure, she’ll look great for a few weeks, but then she’ll get greedy. What you’ll end up with is a giant blob of lime green and nothing else. Judging from the photos I found, she seems to be even more aggressive in window boxes. A better alternative is one of the new sweet potato vines that are supposed to be much more well-mannered, or Lysimachia nummularia ‘Aurea’ (creepy jenny), which still offers that nice color.
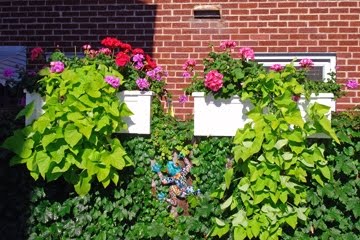
5. Repetition, repetition, repetition. (See how I repeated that?) Pick a few plants and repeat them in your design. Whereas a patio container will look great with clumps of color, if you do that in a window box it will look off balance. Symmetry is a great thing in window boxes.


6. Keep the conditions in mind. You can push the limits on a lot of container plants. For instance, a lot of times you can put a plant that’s really interested in part sun in a very sunny location in container as long as you are committed to watering a lot. You can also shade some plants in a container with other, taller, plants growing next to them. Or, you can rotate a container to give a plant that would otherwise be shaded a bit more light from time to time. But window boxes don’t move and they live in some pretty harsh conditions. Imagine how windy it can be on the top floor of house. Also, since they are against the side of the house, a northern exposure is going to get basically nothing in the way of light, whereas a container just a few feet from the house would at least get some light. My window box is going to be on the south side of the house. The south side of a very reflective white house. There is a very real possibility that I may fry all the plants to death. I plant to counteract this by using self-watering reservoirs in the box as well as making sure I pick tough plants that love sun.

7. Do what you love. I feel that containers are maybe the most personal part of a garden. More care is spent picking the plants for a container than almost any other part of the garden. Each is placed purposefully in a container and because they need so much attention, they are the plants we are most likely to study every day. So if any of all of those guidelines above don’t fit with what you want to put in a window box, then ignore them! If it looks good to you, that’s all that matters.
And here’s what I love. These two window box plantings cover just about everything you’ve read above and another thing I haven’t even addressed, which is changing out your plantings seasonally. Both of these are by Deborah Silver and I think they might be the best window boxes I’ve ever seen. Please check out her portfolio of amazing work or her awesome blog Dirt Simple.

See what I mean about repetition? It’s particularly important in a long series of window boxes like these. The height is perfect and there is the perfect amount of spillers.

And if you thought I loved that design above, I almost can’t describe my love for this planting, full of ornamental kale and cabbage (Brassicas). I WANT this window box.
Photos from Freefoto.com, Hooks & Lattice, DeWald Gardens and Dirt Simple
24 Responses
Do you sell or do you know where I can buy a wrought iron window box cage in fleur de lys pattern? I have one which was bought a long time ago and would like to add a second, but I can’t find this beautiful pattern which you have posted. I’d be so very grateful if you have any suggestions.
Awesome article. I love the second one.Can you recommend bold and simple for a north facing ssecond floor balcony
Hello I love your article. I plant the same plants every year in my containers. ,I had an idea that I actually tried and I absolutely love that I went threw with my decision. I always plant Hibiscus trees, or Elephant ears, sweet potatoes vine, and wave petunias. (In 2 containers that I put in front of my door, 1 on each side of my side walk just before you come to the door )This year all the color chipped off my containers so I spray painted them. I was a bit skeptical at 1st bc the color I choose was much lighter then expected. But I ABSOLUTELY LOVE my containers now. The color of the container makes my flowers stand out so much more… So If your anything like I am and have a hard time with colors, try spray painting your containers.
Hello:
I loved your pictures and advice. I have always wanted a window box and I am planning to get just “one” next spring. I have a brick front and I wonder which is the most practical and easiest window box to buy….would it be a vinyl (white or black) or would you recommend wrought iron with a coco liner? Also, how many pounds of soil and plants plus water is safe so it won’t fall down? My window measures 45″ so I assume I need a box longer than 45″. The sun rises in the front of the house so I will buy sun loving plants.
Thank you for such great inspiration.
I think it depends so much on the style of your house, but in general I prefer vinyl or, even better, some sort of composite (often the same material as composite decking) window box. As for size, bigger is better, and by that I mean width as much as length. Skinny window boxes don’t allow for as many plants and need watering more often. If you don’t have shutters, a few inches beyond the window trim on either side is probably good, but I think if you have shutters that window boxes should be close to the width of the entire window plus shutters. Of course this is personal preference, so you might want to sketch out a few options before committing. As for securing it, that is absolutely key. Of course you need to anchor it into studs, and I quite like french cleats for window boxes, which make it easier to take the box down if need be. Also, consider hanging the box a few inches lower than the window, rather than right under it. This allows for better viewing out the window when it’s planted. I hope that helps.
From as young as I can remember my mother had me help her plant porch boxes for all the grandmothers,(greats, steps, exes all included). We always did it the Saturday before Mother's Day, sometimes in the wee hours of night or real early Sunday morning so they would all wake up Mother's Day to flowers.
My mother, and ALL of those grandmothers have since passed away. I kept some of their porch boxes. Now my daughters know I want planter flowers on the Saturday before Mother's Day. I don't do as good of a job at it as my mother did.
My question for you is: I have read that certain plants keep away ants and flying bugs when planted around the foundation of your home. However, I live beside a frequently flooding river that makes me hesitant to plant anything. If I plant in movable window boxes and line my foundation with them (to be moved when pending flood) would that work the same as actually planting in the ground? Also would theses plants grow together in a box? Basil for Stink and other bugs, Lavender and Geraniums for Mosquito and Flies, and Mint for Ants and Flies.
I am planning window boxes for the south facing windows of our 2d floor NYC apartment. Our neighborhood is a mix of apartment buildings and brownstones, so our windows get direct light for a few hours each day. Should I look for plants that tolerate sun or shade? I'm wanting to secure the boxes & plant in liners, so planting is easier, but I am struggling with the drainage issue. I don't want draining water to damage the building and I don't want the plants to sit in water and damage their roots. Are self watering boxes the only option? They look pricey for 7 windows. Thanks!
Well, I think you've probably hit on the trifeca of tricky situations for window boxes, but don't be discouraged. So first off, the boxes themselves. You have to get ones with proper drainage. Anything else is just a recipe for disaster. I wouldn't worry about damage to the building: you're not really talking about anything more that what might happen when it rains. It's not like it's going to be a constant stream of water coming out of them. Self-watering boxes aren't the only option, but in a second story situation, I think you'll find that it's money well spent (and you want drainage holes with self-watering as well). These are the self-watering inserts I use in my window box. http://www.hooksandlattice.com/self-watering-reservoir.html There may be other options out there, but I can attest to that system working well.
When you do buy or build window boxes, make sure to get them big enough. You want them to be wider than your window and hang them a little low, rather than right under the sill. This way you can have taller plants without obscuring the window as much. Deeper boxes are better as well because you have much more variety in planting and they don't dry out as quickly. If you can't afford to do all seven at once (because yes, that is going to add up) maybe you can split the cost over a couple years and do half this year and half next year? You might also want to look into a cleat system to hang them. This way you can attach the cleat to the building (which wouldn't be too hard to do through a window) and then you just hang the box on the cleat.
As for exposure, that is really a tough one, and I suspect it's going to take a little trial and error. My inclination is to tell you to go for shade plants, because usually shade plants TOLERATE shade but are perfectly happy in some sun. But if it's a hot wall, that can be a challenge. Like I said, I think it may take a couple of seasons to really get a feel for what works there and what you like. I would suggest keeping your design a little simpler and consistent among all the window boxes for a nice unified look. I hope that helps a little! Good luck; I think it will be a fantastic addition to your apartment!
This is the best overview of window box planters I have seen on the web. Hoping you can help me get mine to look great in the next growing season! Instead of window boxes I have two "driveway liner" boxes (permanently built into a front porch). So from the front of the house instead of a long view, the boxes are seen from the end view. Not so great. Fortunately they are slightly different heights with the one closest to the house being a bit higher. Any suggestions on how to arrange the plants so it "looks right" from the short end??? Obviously I need taller ones closer to the house and shorter down in front – but I would really like it to look natural rather than a predictable taller-to-shorter arrangement of plants. Also finding it hard to stick to a few plant choices with all the height variations that are needed. Help please!!
Oh, actually this sounds like a great opportunity to do something really neat. Is there any chance you could email me a photo so I can get a better idea of the configuration? I'd love to help you. Send me a message at [email protected].
I found this post after looking at images of a little town in Switzerland where my family lived for 9 generations and realizing I NEED window boxes in my life. My home has a northern front exposure (it’s kind of awful)- just some early morning sun. Any advice for good shade-loving window box flowers? I’d love something red…
Absolutely, Kasey. Caladiums are great options for window boxes and come in a range of colors including some red hues. Begonias should also tolerate those conditions. I'd also consider shade-tolerate coleus. You might want to play around with texture a little and consider putting some hostas in there. And for something trailing, you could try nasturiums (which may or may not like it), asparagus fern and even some vinca vines are pretty rough and tumble. Good luck!
I have 6 wrought iron baskets on my fence around my pool. Each at least 3' long with the grassy basket filler inside. So whatever I plant will get full sun. In the past I have planted wave petunias and million bells. I'm looking to mix it up with greens and a little heights. Any suggestions?
Hi Tammy!
Oh absolutely! That sounds like a great opportunity for some fantastic baskets. For height, consider either King Tut papyrus grass or Baby Tut. King Tut will get hugely tall, so that will only work if you really want that and if it's not too windy. Baby Tut is much more mannerly, but I think it's perfect in a pool setting. A sun-tolerant coleus (consider a red or purple leafed one) would be perfect as the "filler" and then I'd do something like creepy jenny alternating with million bells for the "spiller." I would stick to the same plants for each box or maybe do two coordinating schemes and alternate them between the boxes, but I'd stick with the same plants in each, just change the colors if you feel like it.
A quick tip about Baby Tut (or King Tut): They are greedy little buggers and will take over as much space as you give them. I pot them into slightly larger containers than they came in (with a fair big of compost) and then cut off the bottoms of the pots and slit the side and sink the entire thing into the window box or container, sort of planting the pot. This gives it enough room to grow and take up nourishment and water from the soil in the container without letting it take over the whole thing and crowd out the rest.
Hope that helps!
Did you notice that on Window Box #3, there were 2 containers….perhaps installing 3 containers instead of two, would have given more balance to the center…..I have this same situation at home. I have 72" to work with and usually use 2 containers of 36"….I'm thinking of switching to 3 – 24" contaners instead…..
I agree … I think one long box or three that would essentially act as one would probably look better. Although it's a big difficult to tell without a photo from farther away to get the whole picture. The only thing to keep in mind is that the small the box, the more you have to water.
Beautiful! Could you please put on your blog how to attach a window box to a brick house? I pictured in my mind that after filling with dirt and watering, if not attached really well, it would fall down! Thank you!!
These are so creative but my fav, of course, is always something I can munch on and prune at the same time. That would make the kale box my fav.
Create a feeling of outdoor rooms using custom planter boxes styled after your house's architecture.
Hello Erin! I found this awesome post on window boxes while trying to put together one for my own blog – so I just had to link this to mine! It's great, well done!
Erin, what a thorough and helpful post! The time you took to show all the different photos was wonderful. So helpful to see the different concepts illustrated so well. Very nice.
You are so right; that last window box is lush, lovely and the one I would take if it was being offered! I also loved the boxes in the first image, but they were completely overshadowed by the bedding on the ground. Too bad.
I've always had "window" boxes while living in Switzerland…, they were on the balcony, and I loved them. Lots of houses have them in Europe.
Great ideas for window boxes! We don't have any on this house but now I may be rethinking that! Thanks!