• Home
  • ABOUT
  • VIDEOS
  • Contact
  • SHOP

The Impatient Gardener

Cottage, DIY

Let’s get bold

February 26, 2013

Slowly but surely the living room transformation from a warm modern French country feel to a more casual, slightly nautical feel has come together.

I showed you the new main seating area (our living room is long and narrow so we have three seating areas). I also showed you how I reupholstered the set of chairs by the game table over near the front door. In between those two areas is the fireplace.

We’ve had two Pottery Barn Malabar chairs there since we bought the house. PB stopped making those chairs after everyone in the world bought them and there was no one left who didn’t own one. I don’t care if they are ubiquitous, I still like them and they are one of the few wicker chairs on earth that is actually comfortable.

Here’s what the living room has looked like for the last 10 years. 

When I redid the main seating area of the living room I was hoping that the old rug in front of the fireplace would still work, but it quickly became obvious that was not the case. Fortunately I’ve found a good home for it (I really loved that rug) at my brother and sister-in-law’s house. With all of the pattern happening between the striped rug and the navy chair and ottoman I was looking for a rug that was a solid color but with lots of texture to keep it from looking boring. Jute or sisal would be my first thought but our light floors rarely look good with natural fiber rugs. When I found this chunky braided wool rug (at rugsusa.com at a really nice price thanks to a good coupon) I loved that it picked up the off-white from the stripe of the main rug and reminded me a little of a fisherman’s sweater.

The chairs before with the great cushion covers my mom made for me, on top of the new braided rug. It just doesn’t work.

So the rug was a keeper but then it became obvious that the yellow large-scale floral on the chair cushions wasn’t going to work. That made me sad too because my mom made those covers for me out of leftover fabric from her family room couch and I still really like the pattern. Also, as you can imagine, even though I got pretty good deals on almost everything new in the room other than the sofa, the “budget” (I use that word loosely because I never really set an amount to spend on it) for this room was pretty much used up. Fortunately I remembered that I still had the original cotton canvas cushions that came with the chairs.

But off-white canvas on an off-white rug? Boring. So a little cushion sprucing up was called for.

I really liked the racing stripe pillows from Serena and Lily, but at $64 a pop, I wouldn’t exactly call that budget-friendly.

Serena and Lily racing stripe pillow

I’ve painted a few strange things (including speakers and hinges), but I have never been really keen on painting fabric. But I couldn’t possibly add another sewing project to my rapidly growing list of things that need to get done when I finally pull the sewing machine back out.

So paint it was. I sampled some fabric paint on a canvas drop cloth (I figured that was close to cotton canvas) but I hated how crispy it was. Plus I was not satisfied with the colors I could find in true fabric paint, so I bought acrylic craft paint that I mixed to a color I liked and fabric medium, which is sort of liquidy white stuff you mix with paint so it stays somewhat pliable on fabric and doesn’t crack like a bad 1980s T-shirt.

I marked the center of the pillow and then measured 4.5 inches on either side for a 9-inch stripe. Later on I got smarter and put a piece of tape vertically down the center and drew the centerline on it to make it easier to get the lines straight all the way down.

After washing and air-drying the covers just to make sure they were clear of any kind of coating that might keep the paint from sticking, I used 3M high-adhesion painter’s tape and after I figured out how to keep the line straight and centered (the hardest part of the project by far), I used a flat wooden spoon to run over the edge to make sure it was really stuck down. For the most part the line stayed pretty crisp, but there was a little creep under the lines where I couldn’t push it down as well, such as where the box cushion covers curved. You can’t really see it unless you look very closely.

I mixed together three different colors of blue Martha Stewart craft paint to get a navy I liked, then followed the instructions on the fabric medium and mixed it in 1-to-1 with the paint.

Although I’ve read about a lot of people rolling paint on fabric, I used a broad cheap artist’s brush I picked up in a three-pack at Michael’s.

I let everything dry overnight just to be extra safe, then I just followed the directions on the back of the fabric medium bottle and ironed everything at medium for 3 to 5 minutes. To be extra sure that the color was set, I also threw the cushion covers in a hot dryer for about 15 minutes.

When I pulled them out of the dryer they were soft and you couldn’t even tell that there was paint on the fabric, but as they cooled they stiffened up a little. If you run your fingers across the pillows you can tell its paint, but it’s not an unpleasant crunchiness like I was worried about. And you can’t tell at all when you sit in them.

Before
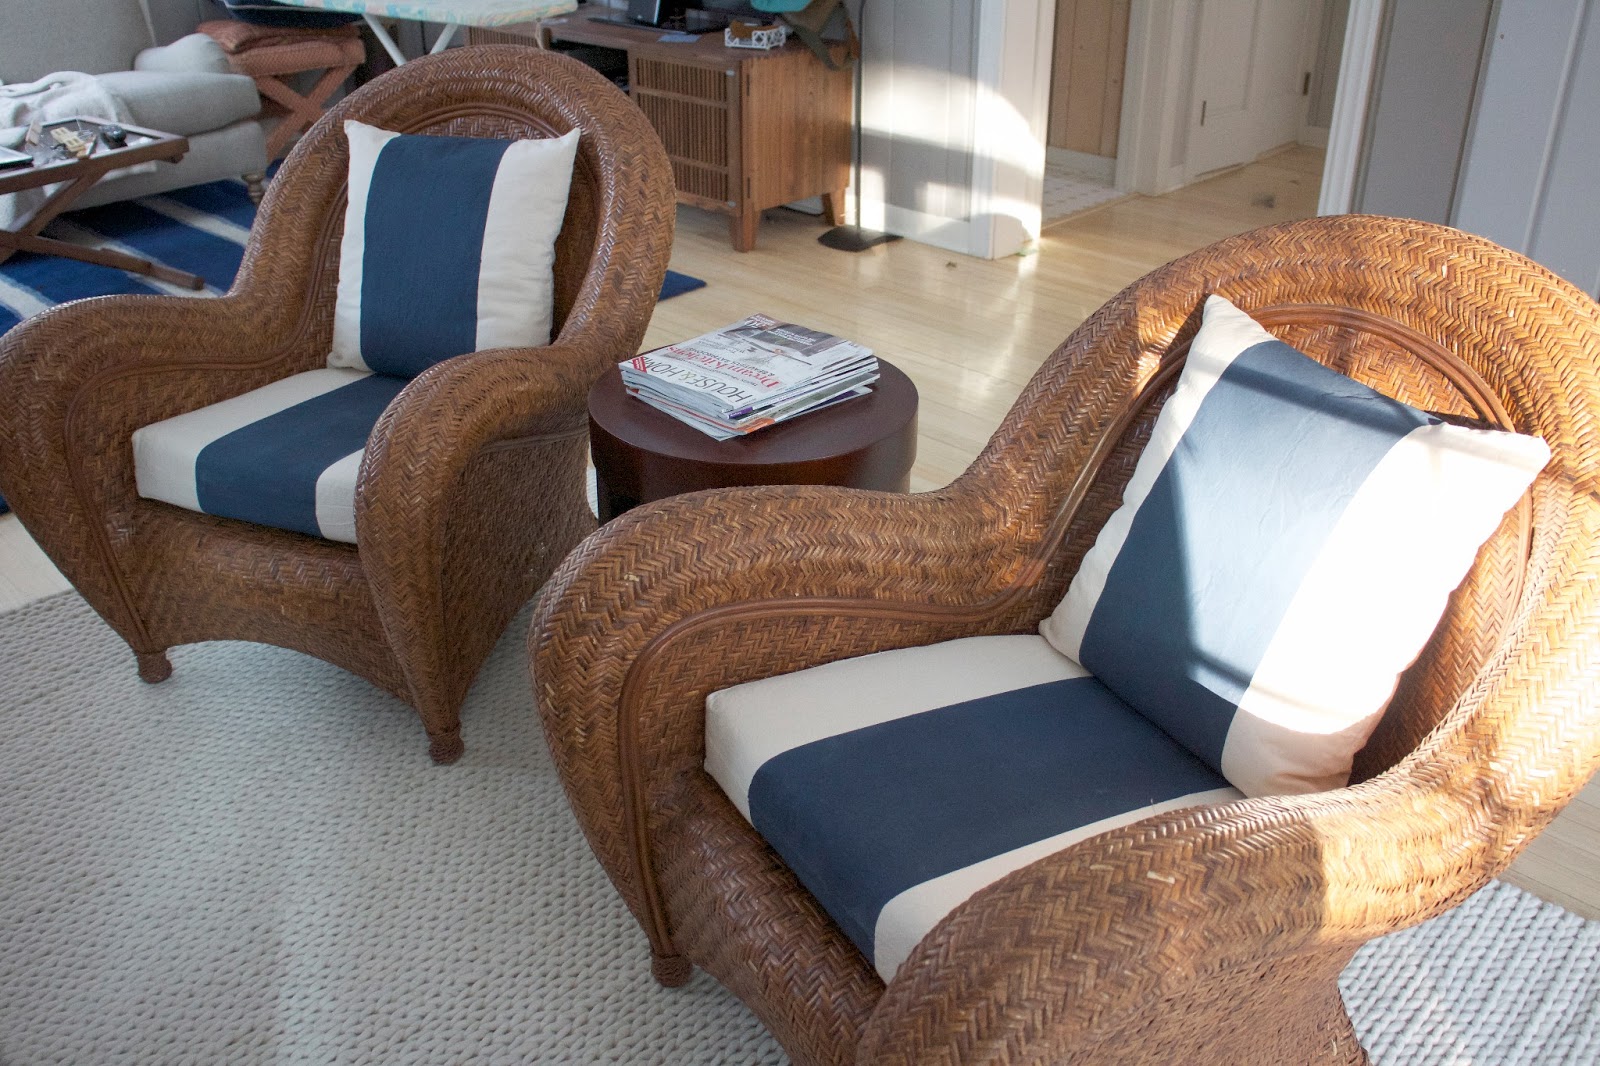
After (P.S. When am I going to learn to pick up the house before I start taking pictures? Yes I iron in the middle of my living room.)

All in all I’m really happy with how they turned out and even more happy that I was able to transform those chair for about $15 in supplies and maybe 90 minutes of work. Everything is looking a little too neutral to me now so I really need to get on my pillow making projects and get some pillows sewn for on those chairs (as well as a few others).

Have you ever painted fabric?

before and after chair living room painting
by Erin @ The Impatient Gardener 
11 Comments

About Erin @ The Impatient Gardener

View all posts by Erin @ The Impatient Gardener

Related Posts

  • FRIDAY FINDS
  • A BASEMENT BEFORE TO MAKE YOU CRINGE
  • A BEFORE AND AFTER 3 YEARS IN THE MAKING
  • HOW TO PAINT WOOD CEILNG PLANKS
previous post: Expert garden bloggers share their favorite shrubs
next post: Who’s doing what on the kitchen renovation

Comments

  1. Stacey {steward of design} says: February 26, 2013 at 5:01 pm

    The cushions look great! Certainly can't tell they're painted from the pics.

    Reply
  2. Jennifer says: February 26, 2013 at 11:40 pm

    I think they look great! I stenciled some curtains using just regular latex paint and also spray painted stripes on a piece of fabric for a chair cover. I am thinking of doing some more fabric painting for some more curtains!

    Reply
  3. Heather - New House New HOme says: February 27, 2013 at 12:17 pm

    Painting fabric seems to be everywhere in blogland lately and I haven't tried it (Yet). I've been scared of the crunchiness too – but you've made it sound very doable. Love how the cushions turned out!!! They go with the nauticual theme perfectly without screaming "sailor".

    Reply
  4. Anonymous says: March 3, 2013 at 10:24 pm

    A friend of mine painted her couch – white canvas wasn't working with three young kids and a hairy dog, so being an artist she just whipped out the paints and went for it! Kind of looked (and felt) like distressed leather when she was done.
    Caroline, Calgary

    Reply
  5. Nancy {at} powellbrower at home says: September 30, 2013 at 9:09 pm

    These look awesome. Ive always loved those chairs and I lOVE that Serena and Lily fabric so you really created a fantastic look. Never painted fabric, but it's on my list. Looks pretty easy!
    xo Nancy

    Reply
  6. Claire says: January 14, 2014 at 12:30 am

    I have this chair and I am trying to get new pillows for it… what are the dimensions of your pillows?

    thanks!

    Reply
    • lahteedah says: September 4, 2015 at 12:33 am

      Did you ever find the dimensions for the cushions? I'm looking, too.
      thanks.

      Reply
      • Sheila A Levesque says: July 5, 2020 at 8:07 pm

        I am also looking for the dimensions as I can’t find a good fit.

        Reply
  7. Anonymous says: August 3, 2014 at 1:57 pm

    I purchase a malabar chair used with no cushion and I am desperately trying to figure out what size foam I need to make a replacement cushion. What size are your bottom cushions?

    Reply
    • lahteedah says: September 4, 2015 at 12:33 am

      did you ever find the dimensions to the cushions? I'm looking, too!
      Thanks.

      Reply
    • Erin Schanen says: September 9, 2015 at 4:57 am

      22" deep by 20 inches wide. The back is rounded to create a U-shape.They are 4 inches tall. Hope that helps!

      Reply

Leave Your Comments Cancel reply

Your email address will not be published. Required fields are marked *

This site uses Akismet to reduce spam. Learn how your comment data is processed.

About

The Impatient Gardener

Do you love gardening? Me too! I'm Erin and I garden in Southeastern Wisconsin, zone 5. The Impatient Gardener is all about real-life gardening: the good parts, the bad bits and even the funny stuff. It's part information, part inspiration and a little bit commiseration. Thanks for visiting.

Here's some more about me.

CONNECT

Awards

Garden Comm award

MY FAVORITE GEAR

https://www.amazon.com/shop/impatientgardener

Instagram

impatientgardener

Erin Schanen 🌿 The Impatient Gardener
I fell in love with gardening through container de I fell in love with gardening through container design and it’s probably still my favorite type of gardening. My trip to Philadelphia area gardens was full of so many excellent ideas. For several years I’ve been enamored with clustered pots, but in my opinion they work best when they are able to stand alone in a space. And you probably know me well enough by now to know that as far as I’m concerned, the bigger the pot, the better. Feast your eyes on these beauties and use your zooming fingers to really get into those nooks and crannies. 

Don’t forget to save your favorites because you know you’re going to be looking for them come next spring. 😀

Photos 1 & 2: Amazing container cluster at @longwoodgardens  that works particularly well because of the restraint used in the design. Also how many different ways is the universe going to tell me I need to grow agave before I actually listen?

Photo 3: This was probably favorite display I saw the whole time and of course it’s from the masters at @chanticleergarden This is a master class in texture. It’s also probably not attainable for the average home gardener because it relies heavily on tropicals that need proper overwintering in order to reach a good size. But there’s no reason why I (or you) couldn’t use this as inspiration to create a similar feel with other plants. 

Photo 4: Strappy foliage, bright orange and colorful pots create such a good doorway collection at @chanticleergarden 

Photo 5, 6 & 7: Similar colors were used at a patio doorway at Steve and Ann Hutton’s Owl Creek Farm home garden. A pot is perfectly framed by an arbor off a side patio. The front entrance has a pink theme (and an amazing feature pot that I couldn’t show here because all my shots are vertical). 

Photo 8: Back to @chanticleergarden where I could have studied this container planting for an hour just to soak up all the detail. 

Photo 9: And while I love a pot with a lot going on, never underestimate the power of a simply planted, gorgeous pot, like this one at @abunting64 garden Belvidere. 

#gbfling2023
I think every garden probably needs a little bit o I think every garden probably needs a little bit of water, even if it’s just a bird bath. All of the fabulous gardens I saw recently in the Philadelphia area incorporated water into them. Here are just a few examples of how lovely these water features were. 

@paxsonhillfarm @northviewgarden @brandywinecottage @longwoodgardens #gbfling2023
Gardens must have places to relax and enjoy the vi Gardens must have places to relax and enjoy the view even though we all know that most of us rarely take the opportunity to use them. The seating I saw in gardens in the Philadelphia area reflected their gardens and all were special. 

Make sure to share your favorite!

Photo 1:  I adored these perfectly lichen-covered chairs at @brandywinecottage

Photo 2: Great lichen game on this bench at Wayne Guymon’s mind-blowing garden WynEden. 

Photo 3: Perhaps my favorite seating moment of the whole trip was this chair in @jennyrosecarey @northviewgarden . Not only was it perfectly lichen covered (are you sensing a theme here?) but a volunteer cleome was growing right up through the middle of it. Unfortunately this photo of it isn’t grata because by this point in the trip my phone (I didn’t want to use my DSLR in the middle of the tropical storm so I switched to my phone) was getting very grumpy about the rain. 

Photo 4: I’d be happy to hang out on these chairs in @abunting64 ‘s gorgeous garden Belvidere. I loved this space. 

Photo 5: Color was the name of the game on this patio at Steve and Ann Hutton’s Owl Creek Farm. 

Photo 6: The most original table and benches I saw were at @abunting64 garden. This was a portion of the garden that was actually on the neighbors’ property adjacent to Andrew’s. It had been a vegetable garden but is getting a bit too shady so it will soon have a new life. 

Photo 7: We visited Barbara Tiffany’s Mill Fleurs in a deluge, which is a shame, and dotted throughout the property are examples of her husband Tiff’s amazing furniture. This was, called the Centipede was upholstered and quite different from the others. All were amazing works of art. 

Photos 8 and 9: The @scott_arboretum at @swarthmorecollege had some excellent seating, from brand new @deebenarc chairs to more lichen-covered charmers.

#gbfling2023
*** I can already see that some people do not unde *** I can already see that some people do not understand humor so let me just say this: 1. I was fully aware of the escaped convict situation (I’m an avid follower of the news, which is common for us journalists). 2. It’s ok to laugh about the fact that I’ve missed the Longwood meadow twice through weird circumstances while being a rational adult and realizing that I’m not making light of the situation that led to the meadow being mown. ***

I missed seeing @longwoodgardens beautiful meadow the first time I visited so I was excited to see it the second time. Not so fast! Turns out it had to be mown down during the search for an escaped convict who was hiding out there (at least that’s what I was told was the reason for the mowing). He’ll never see goldenrod the same way again! 😀

That whole situation was really unfortunate for @longwoodgardens (not to mention everyone who lives in the area), which had to be closed for about a week while the hunt was on!
Load More Follow on Instagram

SEARCH

Popular posts

  • HOW TO MAKE A HOLIDAY WINDOW BOX
  • GARDEN TOUR: WHERE CONIFERS AND TEXTURE RULE
  • Three ways to grow annual poppies
  • Plant to know: Climbing hydrangea

Find us on Facebook

Archives

  • ABOUT
  • TALK TO ME
  • TERMS & DISCLAIMERS
  • PRIVACY POLICY
  • Home

Copyright © 2023 · Prima Donna theme by Georgia Lou Studios

Copyright 2009-2021 ©The Impatient Gardener