You know what a bummer it is when you find something you really like only to discover you really don’t want to spend that much money on it? That sort of sums up my search for lights in the basement, which, as you may recall, we are trying to do on a tight budget. At one point during my search for lights, which was all over the place as I couldn’t decide what kind of “feel” I wanted down there, I found a simple but sharp industrial style light that I kept coming back to. At $130 plus shipping, it would have been in the budget had I only needed one, but it was a no-go when I needed three.
At some point during the process of falling in love with this light, I posted a picture of it on Instagram, to which my friend Eric from Gardenfork replied, “You know you can make that, right?” So I watched Eric’s video on making an industrial pendant light and set to work sourcing the parts.
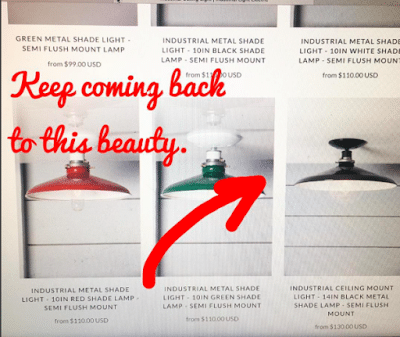 |
| My Instagram post showing the $130 inspiration light that I recreated for $60. |
I had a sneaking suspicion that it probably wasn’t that hard to make some light fixtures, but my concern was knowing what parts I needed. And since I would have to order most of them online, I didn’t want to end up in a situation where I’d order things I didn’t need or fail to order something important. Eric’s video helped with that part and then I went to the Gardenfork Facebook discussion group (a group hosted by Eric for discussing DIY projects, gardening stuff, and tons more), posted the list of the parts I was planning to buy and asked someone who had a clue to check my list to make sure I had everything. Eric was nice enough to reply and I had to swap out one item, but from there it was off to the races. In the end, I was able to recreate the inspiration light for less than half the price!
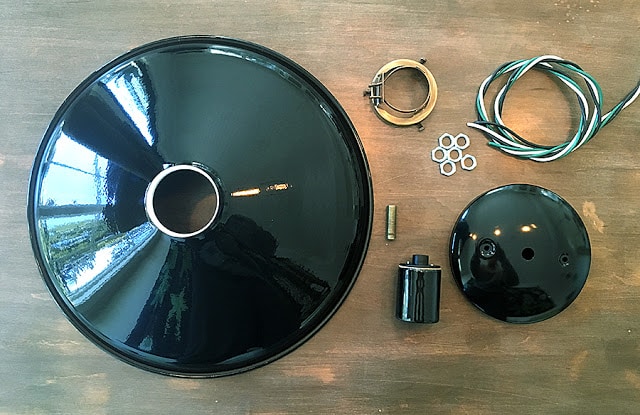 |
| The parts you need to make this light, clockwise from the left: Metal shade, brass shade fitter/clamp, nut, electrical wire, ceiling canopy, porcelain socket, threaded nipple. |
Here are the parts I ordered (links take you to where I ordered them from but there are lots of places to order these things from):
You can absolutely pick up the wire at at the hardware store but I threw it in the cart as long as I was ordering.
Other parts:
- Threaded hollow nipple. We reused the ones from the old lights but we could have purchased them for 38 cents.
- A nut that fits that nipple (purchased locally)
- A canopy “kit” if necessary. This includes the metal piece that stretches across the hole in the ceiling where the electrical comes out (maybe this is called a junction box, but the fact that I made these lights with no concept of what these parts are called ought to reassure you that you can do this) and bolts to screw into. Again, we were able to reuse the old parts from the previous fixtures.
Onto the assembly. This is the part where I should warn you that electricity is dangerous, etc. but you already know that and, frankly, I made it through this alive so you probably will too. (I’m kidding. You will.*)
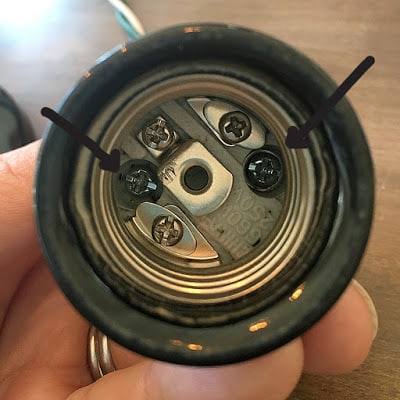 |
| This is the bottom of the socket where the light bulb screws in. The only thing you need to worry about on this end is loosening the screws to allow the cap of the |
Start by unscrewing the cap from the socket. There are a bunch of screws in there so make sure to only unscrew the ones holding the cap on.
Then use a wire strippers to take off about 1/4-inch of the plastic covering from the end of the hot (black) and neutral (white) wires and about a half-inch off the ground (green) wire.
Next, you have to attach the hot and neutral wires. Start by twisting the exposed ends of the wire and bending it into a 90-degree angle (just to make it easier to fit in the space. When you look in the socket, there will be a screw on either side of the green screw. Each is backed by a small plate, one in silver, one in brass. Attach light to light and dark to dark, so the black wire goes to the screw on with the brass plate and the white wire goes to the screw with the silver plate (it’s hard to see in these photos but when you have the socket in front of you it’s obvious). Unscrew the screw a few turns, slip the exposed wire under it and tighten. When you think it’s snug, give it a little tug to make sure it’s really in there. Do this for both wires.
Next, wrap the green ground wire around the green screw in the same fashion. This screw is larger, so you can make a hook with the wire and sort of wrap it around the screw before tightening.
Thread the nipple into the cap of the socket, tighten the set screw on the cap and feed your wires through it, working the cap down.
This next bit takes a little doing because there are a lot of wires to jam in that tiny socket, but work them down as best you can, then tighten the screws that hold the cap on firmly.
When it’s on it should look like this:
Now take a deep breath because you’ve done the hard bit. Next you want to feed the wires through the canopy and push the nipple through the hole (there will be no snickering, thank you very much).
Use a nut to secure the canopy tight to the socket.
Then attach the shade holder to the shade. It just slips on and you tighten the screws. Slide the socket in the top and tighten the top clamp screw to secure it. We actually did this after we wired the lights to the ceiling as it was easier to attach everything without the shade on.
Then wire it to the existing electrical box like you would any other light. Mount the canopy onto the metal holder on the junction box to secure the light to the ceiling.
And that’s it … a light that, as far as I can tell, is identical to one you can buy, except mine cost $60 and the inspiration light was $130.
Here’s the inspiration:
And here’s mine:
* But if you don’t, don’t blame me.


6 Responses
Well, doesn't that make you feel good? It looks great too.
Looks great but I can't imagine doing this. You are as gutsy as you are creative. Our basement ceiling is quite low so our remodel will need recessed lights of some kind. Probably just fluorescent as it will mainly be work space (drawing and wood shop) and storage space.
I am very impressed!
You DID it!! LOVE! I'm very tempted to make a few for our cottage in Maine. xoxo
Yours is even cooler. :o) Well done, you!