 |
| The layout of the kitchen will stay the same. |
So here are the goals for the kitchen:
1. Fix/paint/de-grossify the kitchen cabinets.
2. Make the storage that we have more functional.
3. Get the upper cabinets up to the ceiling. I know it seems weird that that was so high on the priority list, but I truly detest the layer of disgusting dirty/grease/film that accumulates on top of kitchen cabinets. I also don’t really care for a whole like of over-cabinet accessorizing. And I think that cabinets that go to the ceiling make a room look much larger and a ceiling look much taller.
4. Get a new sink. The cast iron Kohler sink we have is always dirty and the whole divided sink situation does not work for us at all.
Further down on the priority list were things like removing the awkward pantry build-out (formerly the laundry “room”) and new kitchen counters. Although the laminate counters don’t really look too bad, the speckled gray never really did it for me.
The thing with kitchens is that they aren’t rooms that are well-suited to doing them piecemeal. For instance, I think the room could be greatly improved upon with a tile backplash, but you wouldn’t really want to put a tile backsplash in without having counters you really loved, and you can’t touch the cabinets after you’ve put on a countertop you really love. So you have to do it in reverse order: cabinets, counters, backsplash.
Degrossifying of the current cabinets could be done. I’m certain there is some noxious chemical that would clean them up better. The places where the wood is cracked could be filled at least temporarily. And paint could make they shiny and lovely. Other things like the skimpy hinges that constantly needed adjusting to make the doors close and the fact that they are only 16 inches above the counter couldn’t easily be fixed.
Last year when I painted the cabinets in my office, I did it as a trial for painting our kitchen cabinets, which was my intention. The project, even for the few cabinets in my office was an incredible amount of work and took a very, very long time. Our house just isn’t well suited to large painting projects. By the time I finished painting the office cabinets I already knew I would not be painting our kitchen cabinets. I only got one casual estimate on painting them, and that was about $2,500, which is much more than painting new cabinets (significantly less prep work).
 |
| This is part of the almost half-inch stack of papers I gave Ryan. It was a combination of drawings I did on Adobe Illustrator that were roughly to scale (but did not include frames and fillers), pictures of features that I liked and wanted to incorporate and technical drawings for things like the sink and vent hood. I made little hand-written notes on all of them. Fortunately, since we’ve worked together twice before, Ryan understands my process and usually actually gets what I’m saying. |

So the plan was to have cabinetmaker extraordinaire Ryan (who built our banquette and the built-ins in our bedroom) build new upper cabinets that would be mounted in the proper place and go to the ceiling. Then he would fix up some of the shortcomings of our existing lower cabinets, installing a few drawers and refacing them. He would also have to get a little creative to make end panels, etc. match the new faces. And then I got the quote from him. Fixing up these cheaply made cabinets would only be $500 cheaper than installing all new cabinets. In other words, there would be so much labor involved in fixing them, that there was only a small additional material cost (and less labor) to put in all new ones. Well we didn’t have to think about that for long.
So we’re replacing the cabinetry. It won’t look a whole lot different from what is there now. It will still be white, with a slightly different door style. There will be a lot more glass than there is now. If it were up to me we’d have basically no upper cabinets and a lot of windows, but adding windows doesn’t work so I’m planning to make it feel lighter and airier by putting all glass uppers (sides too) on the wall with the sink.
We’re getting new counters (yay!) and a new single-bowl undermount stainless steel sink. All of the appliances will stay, as will the floors.
We are going to add a traditional vent hood. Even though our Jenn-Air range has a downdraft, we’re putting in a conventional updraft hood as well. Mostly that is to give us more options in the future when it come time to replace the range. There were exactly two ranges that would fit in our kitchen when we replaced the old electric range when we moved in: an all-gas Jenn-Air range or a dual-fuel Jenn-Air range. We picked the latter. And while it works just fine now and we hope it continues to work fine for much longer, Jenn-Air does not have the best longevity record from what I’ve read. So the odds are good that the range (which is now almost 10 years old) will need replacing well before the kitchen needs updating (which I hope is like 30 years from now) and I don’t want to be stuck with one option again. Plus, I’ll be honest, the downdraft doesn’t work quite as well as most updrafts do, although it’s passable for most cooking.
As far as the cabinetry goes, we’re going to have the same beaded recessed panel style that we used in our bedroom built-ins but they will be full overlay cabinets (in other words, they cover the frames, or most of them) instead of inset cabinets (where they are set in the frames). We picked a slightly wider rail size than most Shaker cabinets because I wanted something a little beefier looking. This is just one of the decisions that I agonized over.
Most of the lower cabinets will be drawers instead of doors. I am so sick of sitting on the floor to root to the back of a cupboard to find something.
 |
| This is a sample of the crown molding that will go around the top of the cabinets. We’ll extend the top piece around the rest of the room as well, which will be our first try at installing crown molding. |
There will be a significant amount of gimmicky storage solutions. What can I say; it’s my weakness. I love gadgety stuff, so when you combine that with really clever storage you have something I just can’t resist. I can’t wait to tell you (and show you soon, I hope) about some of the cool things we’re doing. You know my theory: When you live in a small house you take advantage of every bit of storage you can find. I will know this kitchen is a success if there is nothing more than pepper mill and maybe a bottle of dish soap and a plant on the counter.
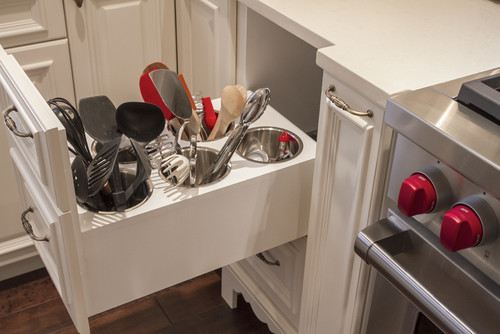
I’ll share more on this stuff later, but I might be more excited about this drawer than almost anything else going in the kitchen:
Between the more functional storage we’ll gain from some of these solutions, plus the added space we’ll get from taller cabinets, I think we’ll have plenty of room in the kitchen.
We already had the wall that was build around the stacked washer and dryer (which later became our pantry) removed so that the wall where the fridge is can be all cabinetry. I also wanted to move the opening between the eating and working areas of the kitchen back about 7 inches but it turns out the beam over that area doesn’t extend all the way to the next wall and therefore that can’t be moved without installed a whole new beam. And while I’m more than a little familiar with the whole “as long as we’re at it …” theory of renovation (see massive project that started with a new roof and ended up with taking the top half of the house off), this project will NOT turn into that. Do you see me digging in my heels here? I’m just not up to it, nor is it necessary.
 |
| The existing fridge surround and the wall around the pantry were removed last week. I wanted to move that wall next to the shelf part of the banquette back 7 inches, but unfortunately that would necessitate replacing a beam and it’s just not worth it to gain 7 inches of wall space. |
Of course there is a little big of pretty involved in this project and I can’t wait to show you that either, since that’s one of the more fun parts.
So here’s the breakdown of who is doing what and what’s all happening with our kitchen:
Me and Mr. Much More Patient:
 |
| I’ll have to sand and patch that portion of the wood ceiling when I redo the ceilings. Ugh. You can also see where the tile floor will need to be patched in this picture. |
Ryan (cabinet maker extraordinaire):
5 Responses
I am excited to see the "After"! And I agree with you on over the cabinet decor. Nothing looks cheaper or plastic-er than fake plants on top of your cabinets.
And they get gross. Can you tell I have an almost irrational fear of greasy dust?
I wish we had extended our cabinets up to the ceiling when we did our facelift in the fall, but it just wasn't in the budget. The painting of the cabinets took me about 3 weeks all together – time well spent, but so laborious I would never do it again. Still waiting for the budget to allow for a new counter (which also includes a new sink and backsplash). Hoping to get that done sometime this spring.
Can't wait to see the after, Erin. It's going to be fabulous!!
I imagine this is already too late: but here is my solution to the paper towel problem: in a cabinet next to you sink, have a box at the back open at the bottom. Inside the cabinet it gives tou a lower half shelf and a higher half shelf. (Actually more like 1/3 2/3) anyway, the paper towel holder is mounted in the box, it pulls down under the cabinet but you can't see the roll. Works great – for 10 years in my kitchen
I actually don't think it is too late. Well, I'm not actually sure, but either way your solution sounds great. You don't have a picture of it by any chance do you? I'd love to see it.