Prepare yourselves. I’m about to tell you how to plant a tree in a way that may go against everything you’ve ever been told about planting a tree. But bear with me because I’m also going to tell you why it’s a good idea to plant a tree like this.
Plant a tree for life, not for the short term.
First of all, you need to start thinking about a tree as a many-year (possibly a lifetime) investment. You need to think about the long-term health of it, not just the next five years. There are things you can do when you plant a tree that will determine if it lives to see your kids’ weddings, or perhaps the next owner’s kids’ weddings.
The typical advice about planting containerized or balled and burlapped trees is to disturb the roots as little as possible and plunk it in a very wide but not too deep hole. For balled and burlapped trees this advice often includes leaving all the burlap intact to rot away naturally (which I’ve actually never seen happen), which you pretty much have to do in order to leave on the wire cage that holds the whole thing together.
Here are the problems with that method:
Once roots start circling, as they are wont to do when grown in containers or spend a lot of time in the balled and burlapped state, they will continue to circle because they have “root memory.” Roots that circle will never properly anchor a tree and are lightly to girdle the whole thing, essentially choking itself off.
Trees, like almost all plants, do not like leaving familiar territory. Roots are unlikely to stretch out beyond the conditions in which they are accustomed. This is why it is no longer advised to put a “$5 plant in a $25 hole.” Why would roots want to seek water and nutrition and stretch out if they are comfy in their little universe?
It’s very easy to plant containerized or balled trees too deeply because they’ve been growing that way at the nursery.
Balled and burlapped trees are typically grown in clay because it’s the only kind of soil that will stay together in a ball, but few people grow trees in full clay. My garden is certainly an example of that. My soil is mostly sand or sandy loam, although there is some clay in a few spots in the yard where clearly fill had been brought in at some point.
So when I got a tree recently—an espalier Asian pear that I’ve been desiring for a long time—I planted it in a way that was pretty much exactly the opposite of what the nursery advised. I turned it into a bare root plant.
Don’t freak out. This whole process moves quickly so at no point are the roots allowed to dry out. Here’s the process:
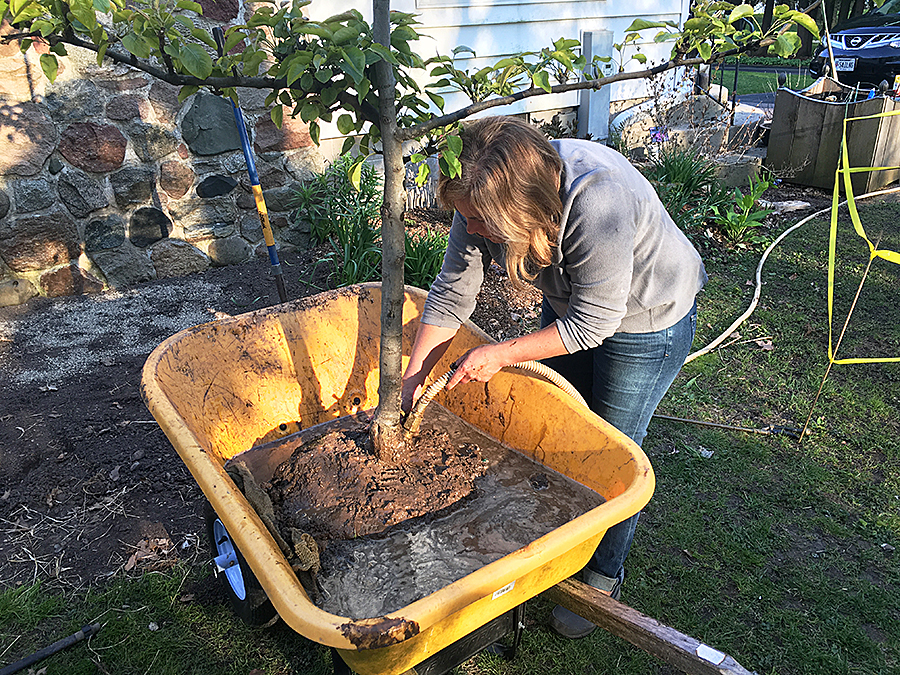
1. Lift the whole thing into a very sturdy wheelbarrow. A kiddie pool would work too. Then fill it with a few inches of water and let it soak for several hours. The bottom of a balled and burlapped tree is likely to be hard as a rock so it needs some time to soften up.
Start with the tree in a wheelbarrow or kiddie pool and allow the bottom to soak in a few inches of water for several hours to help loosen the root ball.
2. Then use a hose and some gentle work with your hands to carefully work all of the soil off the root ball without tearing away fine roots. I’m not going to lie, this is a long, messy process.
Carefully wash all the soil off the roots. In the beginning of the process, above, you’ll be breaking off big chunks. At the end, you have to tease it out through the roots, as shown in the quick video below.
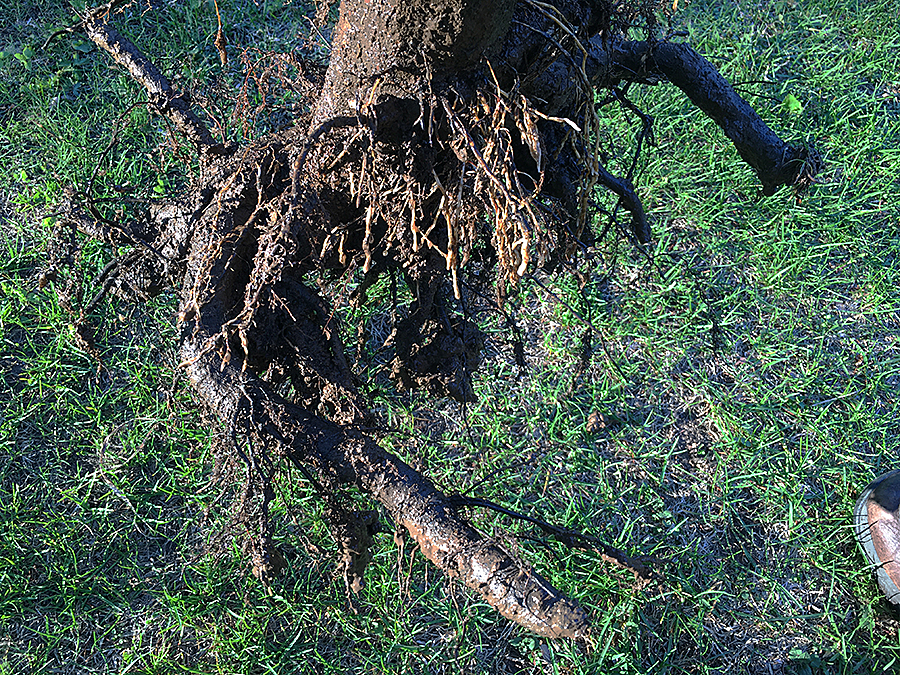
3. When all the dirt has been washed off from the roots, examine the root ball. Look for circling roots and cut them. Clean up jagged roots (mine had a ton of these that seemed to have been ripped off and scabbed over).
Here’s what the roots looked like when I cleaned off the soil. There were two huge roots that had been ripped apart at some point and a few fiberous roots. I would have liked to see a lot more.
4. Find the root flare. This is where the trunk flares out and the roots begin. That is the level where you want the top of the soil when you plant.
5. Dig your hole as you usually would—at least twice as wide as the root ball and no deeper. In fact it’s best to plant just a touch high to accommodate for the soil settling. Don’t add any amendments to the hole. (I did sprinkle some mycrohizal fungi on the roots. There is some discussion as to whether this does anything or it’s a feel-good thing, but I opted for feel-good put some on.)
6. Place your tree, making sure to face it the best direction and check that the soil level is correct by laying something—a long stake or a shovel— across the hole, then gradually add soil to the hole. About halfway through, firm in the soil—I like to face my foot toward the truck and my heel out and gently press down in a circle. Don’t smash it! You’re just trying to firm in the tree, not squish the life out of it.
7. Add in more soil and repeat the firming process.
Firm in the soil by gently pushing with your heel around the tree.
8. Water it well, preferably using the water from the root-washing process which can have beneficial bacteria in it.
Water in well, preferably using water from the root washing process.
9. Once you’ve watered and all the water has been absorbed, check the soil level again and add more if necessary.
10. Mulch deeply around the root zone, but don’t pile up mulch on the trunk. If need be, water again at this stage.
11. Stake the trunk low and remember to remove the stake when the tree seems well anchored, no more than year from planting.
A few notes about my specific situation:
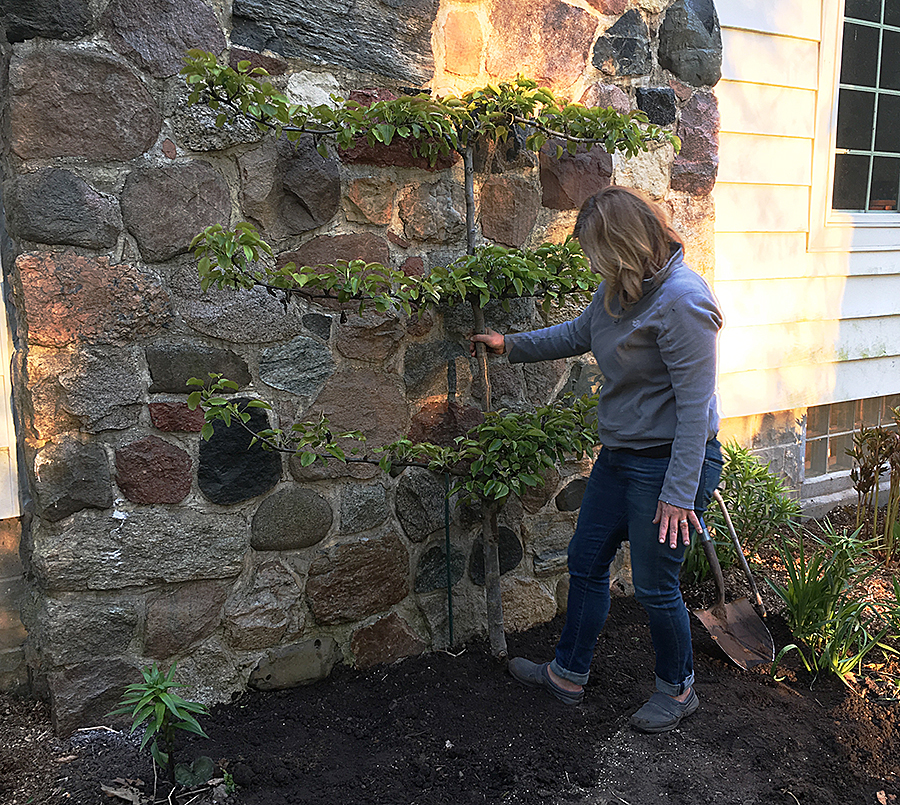
Because I was planting an espalier tree that will be supported by guide wires on the fireplace facade, I planted the tree quite close to the house, about 14 inches. This is much closer than you should ever plant a tree in any other case.
I also didn’t stake the tree because of it’s location and the guide wires. There won’t be wind whipping this tree around so I skipped the stake, but it’s an important step in almost any other case.
I firmed down the soil under the root ball only because I’d recently put that soil in from another spot in the garden. Here’s why I did that.
When the tree is planted, it’s not uncommon that it will sulk a bit at first. Don’t freak out. The tree is stressed. It has experienced a drastic change in growing conditions and its roots have been disturbed. This is unlike what you’ve probably experienced with other methods of planting (and a good reason to plant in spring or fall but not the heat of summer, which is stressful enough on its own), but keep in mind that you’re aiming for the long term health of the tree here.
You will probably have to be very careful about watering for the first two weeks. I don’t want the roots to dry out at all during this time, so I stay on top of the watering, but be sure not to over water, which is probably worse. Once you’re past this first critical period, you should go to a “proper” watering schedule, which is to say regular but infrequent (generally weekly) deep watering. This encourages deep root growth rather than surface root growth.
The planted tree is looking pretty good in its new home and it has acquired its own bodyguard.
I bet you’re skeptical right now and maybe even thinking, “Planting the old way worked fine, why change it?” But did it really work better? Have you seen trees die or just fall over in a wind storm? Of course these things happen for other reasons as well, but often it’s because of improper planting. And just think about it: Doesn’t it make sense to get a tree growing in the soil that it will call home for the rest of its life from the get-go?
Here’s a study on this method if you need a little science to quell your skepticism. And here’s more information on the why of this.
What would you like to know? Search, or jump to categories below.
That is going to be gorgeous! I think you are right about this process. I am always teasing roots and knocking off soil when I put in perennials, so why not trees and shrubs. We've had problems with girdling roots from planting trees the old way.
Thanks so much for this post. I have just been watching the bumblebees pollinating my 50 year old plum tree and my new plum tree planted last year. I have wanted to start an espaliered orchard here along the garden fence for a long time but it is almost impossible to buy espaliered trees here. I really enjoyed your post.
We use cookies to enhance your browsing experience and provide personalized content. By clicking 'Accept All Cookies,' you consent to the use of all cookies. You can manage your preferences by clicking 'Cookie Settings.' For more information, please read our Cookie Policy. By continuing to use our site, you agree to our use of cookiesAccept All CookiesPrivacy Policy


3 Responses
Your tree is looking good against the chimney. Grow little tree, grow…
That is going to be gorgeous! I think you are right about this process. I am always teasing roots and knocking off soil when I put in perennials, so why not trees and shrubs. We've had problems with girdling roots from planting trees the old way.
Thanks so much for this post. I have just been watching the bumblebees pollinating my 50 year old plum tree and my new plum tree planted last year. I have wanted to start an espaliered orchard here along the garden fence for a long time but it is almost impossible to buy espaliered trees here. I really enjoyed your post.