So I bring you my slightly-out-of-scale and very artistic (in an abstract kind of way) drawing of our property to help you get a feel for the place.
I’ll post this under the “Garden” tab at the top of the page as well so you can refer to it in the future.

To give you a feel for what you’re looking at there, the brown strip on the left is the main road. It’s a private gravel road owned and maintained by the homeowners, and it serves about 15 or so homes.
The property runs at an angle on the east side. The angle follows the shoreline of Lake Michigan which is about 500 feet to the east. There is a row of houses in between us and the lake.
The entire property is 1.3 acres, about one-third to a half of which are wooded. We have several enormous and very mature trees on the property, some of which are shown, but many of which are not. I’ve tried to show the more cultivated areas in the blue-green color.
When we bought the house (and I’m still looking for the photos I took then), the only garden areas were on the west side of the house and off the patio, which was an L-shaped area about 10 feet deep planted entirely in very tall ornamental grasses. The previous owner (who used it as a rarely visited summer home) was looking for low maintenance planting that would provide privacy. For the one summer we lived with the grasses, I think what she actually achieved was a low maintenance mouse subdivision that routinely flopped over and laid there for the rest of summer. The area that became the circle garden was a derelict vegetable garden leftover from an owner before the one we bought the house from.
My memory is fuzzy as to what we did when, but here are my best guesses.
MAIN GARDEN
In 2003, after living with the ornamental grasses for a year, we plowed down the entire lot of them with one of those giant weed mowers. In the process we killed at least 50 mice (and just imagine how many of them actually got away). We dug out every bit of roots we could find, heavily amended the soil and created the basic shape that exists today.
The cornerstone of this garden is a Serviceberry tree planted in the southeast corner of it. My mother-in-law bought it for us that year as a one-inch caliber tree. Today it is at least 20 feet tall and the trunk is easily 6 inches in diameter.
WEST SIDE GARDEN
This garden existed when we bought the house but over the years I reshaped the bed and replanted it. There is a peony there that I’ve never moved, but I think everything else was put there by me. It’s a difficult spot to site plants for, but I currently have a witch hazel growing in front of the chimney with ‘Blackout’ heucheras and Hakonechloa ‘All Gold’ surrounding that.
CIRCLE GARDEN
First off, the circle garden is not a circle; it’s an oval. I think I wanted something a bit more structured in the yard, but not too formal so I landed on an oval. I think I built it in about 2006 with the intention of using a portion of it for vegetable growing. Unfortunately the rapidly growing trees around it had other ideas and within three years it just wasn’t cutting it for vegetables (and I had no way to rotate crops).
This is what it looked like when I first built it.
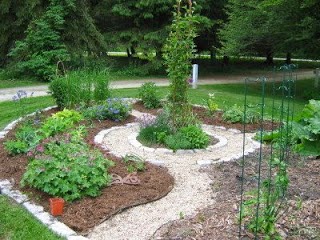
The clematis in the center (‘Ken Donson’) is still there and has been joined by a ‘William Baffin’ climbing rose. The rhubarb still grows in same place (you can see it peeking out of the right side of the photo) and several peonies anchor it on the south end. Today it is filled with a mix of things that always seem to be changing.
The north segment of it (right side in the above photo) is now home to the chive hedge that I’m quite fond of and hope to continue around the entire garden.

SHADE GARDEN
I think I started working on the portion of the shade garden that is west of the most western bridge across the creek in about 2008. This area was just weeds, and I’ll be honest, a lot of it still is. I have attempted to make a garden out of only the bit closest to the grass on that side of the house. It is a huge area and one that I did on a budget, so most of the plants for it were purchased in thumbpots, meant to be grown out for a year or two before braving it in the garden. Because of that, things are sparse and the whole area is in need of some attention, but I love having a place for shade plants, which are often exotic and so beautiful.
A sunnier spot is just to the east of that bridge, where I’ve planted mostly divisions from other areas of the garden.
In 2013 we took down a huge cedar tree on the easternmost portion of the area I’ve labeled the shade garden. It’s a new garden but there are some lovely plants there, including Cornus ‘Venus’, which I hope thrives in that location.
DECK GARDEN AND PATH
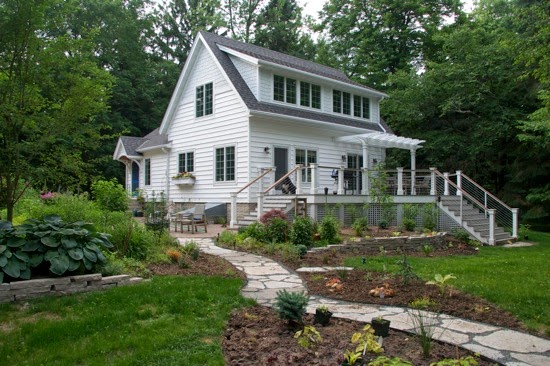
Everything on the east side of the house changed after we did a major renovation of our house in 2010 and 2011. We added a large deck that changed the whole feel of that part of the property.
In 2011 I built a path out to the garage as well as two stacked stone walls on either side of it to act as small retaining walls to accommodate the change in elevation in that part of the yard without having to regrade the entire thing. Here’s what it looked like when it finished (and before).
Just this year, I worked on the back yard again, reshaping some of the existing beds and sprucing up the east side of the property.

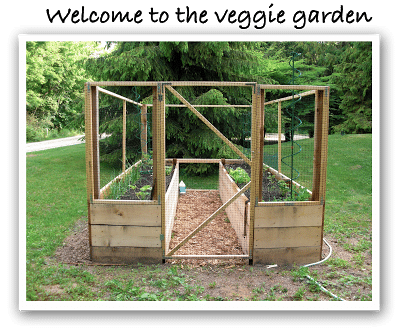
VEGGIE GARDENS
We built the main veggie garden in 2009. I added the additional rectangular raised bed in 2011 and the L-shaped raised bed in 2013. The additional raised beds are not enclosed and therefore are limited to things that deer won’t eat. I planted a half-moon shaped bed of comfrey to the west of the veggie garden this year. This should help keep the useful but aggressive comfrey from going places in my garden that I don’t want it.
I hope that gives you a better idea of what I’m talking about here on the blog.
4 Responses
Kudos to you for making such a nice garden map — and watercolor too! I feel quite strongly that every garden story should have a map helping readers understand the layout of the property and how the various garden ares relate to each other (I actually collect pictures of garden maps and have been thinking about doing a blog post about them.) Your map does make it much clearer to me how your property is laid out. And it also makes some sense of why your side yard is called the back yard: because it is behind the house in relation to the road (your house front does not face the road, nor does mine). Very nice!
Your artistic skills are pretty good, my friend. This overview certainly shows the amount of work you two have done over the years. I bet your neighbours comment on the changes all the time.
I love it when people do a tour of their garden with a map and all, it helps everything to make so much more sense. You have a lovely amount of space and a great mix of areas and planting.
Fabulous! Last year I spent ages doing a drawing on graph paper of the main flower beds. But we took out so much after the winter that my drawing is useless. Your drawing is time well spent because it lets us understand your layout and I bet it will help you think through future changes. Your post yesterday about the new garden inspired me to go shopping!