Happy new year, everyone! I hope you had a nice New Year’s Eve and a great first day 2014. I was happy to get the house completely de-Christmassed. As much as I like the decorations (and I really just got them up about a week and a half ago), it’s still nice to reclaim the house.
Last weekend, when I was supposed to be taking down the Christmas decorations, I got involved in a few other projects that seemed like way more fun. It was nice to check a few things off the to-do list that have been lingering there for quite some time.
We have a very small hallway downstairs that is a total nothing space. It’s not really offensive, but it’s completely blah, and it’s been on the list to get a little love for quite some time.
Here’s what it has looked like since we bought the house (other than the blue stripe on the ceiling, which was a color test and the yellow tape on the trim in preparation for painting).
Nothing to get excited about right? The kitchen is the doorway to the right, the bathroom is to the left, the two doors on the left that you see are closets and straight ahead is the sunroom/den/back room (I really have to decide what I’m going to call that room so I can quit with all the slashes). This is taken from the living room.
The ceiling was the same pickled knotty pine that was in the kitchen before I painted it (
the first time and the
second time when I realized it really needed to be semi-gloss). The wainscotting is a continuation from the living room and you notice that the walls have the hideous plaster texture on them. Oh, and let’s not forget the light. It was a cheap plastic light fixture that had one big thing going for it: it wasn’t a boob light.
About seven hours later, here’s what it looked like. I love that this was one of those projects that didn’t take too much time and made such a big change.
I painted the ceiling with the same method I used in the kitchen. First I sanded the whole thing. It’s a pain, but it’s key. Then I primed with BIN shellac primer. When I did the kitchen I just spot primed the knots with BIN, which seals the knots from “leaking” through the paint and then primed the entire ceiling with a standard primer, but the hallway was so small I just did the entire thing in BIN, which has the advantage of drying in 45 minutes.
Then I followed up with two coats of semi-gloss paint. The first coat was Benjamin Moore Bird’s Egg, but it turned out a bit too intense for me. So for the second coat I made a custom blend (this is not something I like to do because it’s impossible to replicate the color in the future, but I really wanted to finish up this project that day) that was a mix of the Bird’s Egg, Wythe Blue and Mascarpone, all of which I had on hand. That lightened up the Bird’s Egg just a touch and the Wythe Blue added a bit of greeny gray that I liked as well.
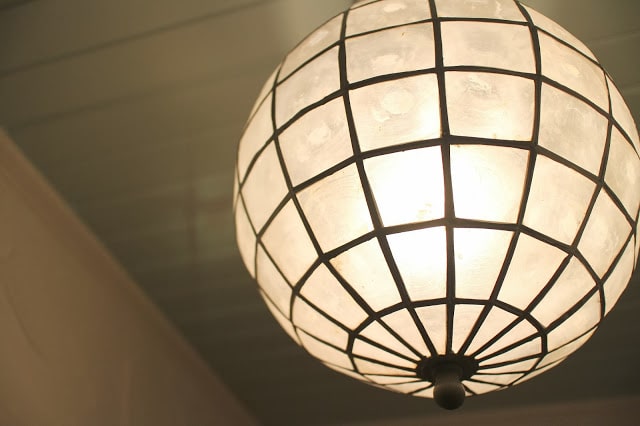
When the paint was (more or less) dry, we installed the new light, that I had purchased way back in spring. It’s a capiz shell globe that I picked up on a great sale from Pottery Barn Teen. I was rather surprised when it showed up and found out it was only the shade, without a light kit, and I had a hard time finding a light kit that would work with it. I ended up finding one for a pretty good price from World Market, but it was irritating to me that it didn’t come with one.
This is just stage one of what I’d like to do in the hallway. I want to paint the wainscotting the same Gray Huskie that is in the living room. Then I want to get rid of the icky wall texture. While just replacing the drywall is the easiest way to do that (and what we did in the living room), this is a small enough space that I’m going to try just sanding it all. It’s going to create a hideous mess, but I don’t think it will take that long. Once that’s done the walls, all the trim and the doors will all get a coat of Mascarpone like the rest of the trim in the house (except the kitchen and the upstairs bathroom). And I’d really like to move the thermostat over a touch so I could fit some art on that wall.
There’s more work to do but I’m happy it’s on the road to looking like more of a space and less of an afterthought.


3 Responses
That is lame that they did not include a kit – but the finished result is fab. Happy New Year, Erin!
Why the heck would they sell just the shade? Oh well, it's so beautiful I think it was worth the hassle.
As for the sanding of the walls – we did that years ago in a previous home – the hallway had one (just one) wall of textured stucco. We sanded and sanded and sanded to get it smooth (it never was super smooth) and there was dust EVERYWHERE – inside cupboards, inside drawers, between cushions. And this was even with covering doors with plastic, etc. It was worth it in the end, but what a mess.
But hey, what else are you going to do while we're in this deep freeze!
Looks like the ceiling color you mixed up turned out wonderful!!