Sometimes there are little things that challenge our sanity, and I think I have identified the number one offender. You know what I’m talking about folks … it’s the damn junk drawer.
I didn’t even bother taking a before picture. You know what a horrible junk drawer looks like; I don’t need to share my horror with you.
It’s a bit sad that it has taken me this long to get the junk drawer organized after our kitchen renovation. It’s just not one of those fun things to do and when the kitchen was all finished I just sort of threw all the stuff in it. When we could no longer open the drawer I figured it was time to do something about it.
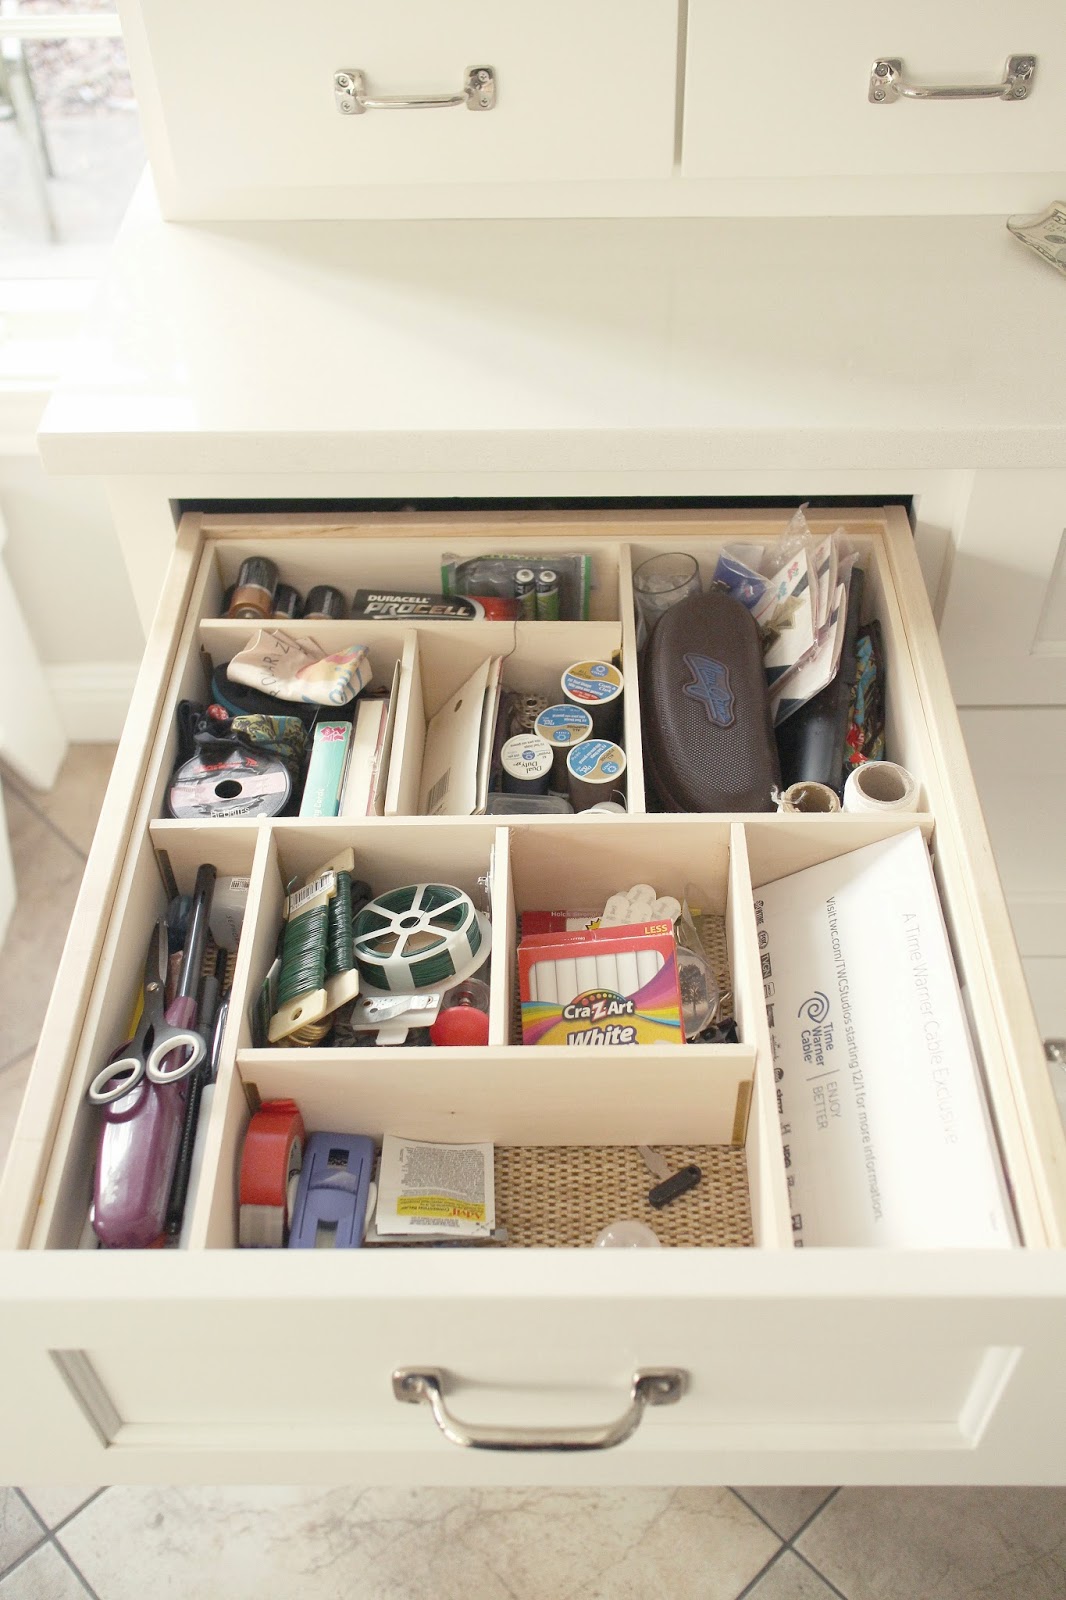
Let’s just skip ahead to the pretty after picture, shall we? That way you can get all excited about doing it yourself.
Of course there are a million organizing systems out there for junk drawers, but there are two things wrong with them: 1. They consist of various compartments that do not necessarily fit snugly in your drawer so even after you install them, they slide around, and 2. After you add up all those little compartments they can be pretty expensive.
That’s why I love this DIY custom organizing system. The only things you need to buy for this are the metal fittings that your compartment dividers slide in (I bought mine
here) to and the wood strips for dividers (like
this, although they come in multiple heights so if you have a shallow drawer you can buy the 3-inchers).
You can install this right into your drawer, but I didn’t want to permanently commit to this layout, so I started by making a box frame to fit snugly inside the drawer.
This wood couldn’t be easier to work with. I used a chop saw to cut it but it is so lightweight and soft (for wood) that any kind of saw, including a plain old coping saw or handheld saw would cut it without much effort.
Remember to factor in the width of the balsa (or basswood) on the two ends (it is a quarter-inch thick, so I subtracted a half inch from the width measurement) so you don’t make your frame too large. I glued it with wood glue and then just tacked with staples. Normally I’d use brad nails, but I had the upholstery stapler handy so I just used that.
After that, you just have to decide what sort of compartments you want. For me, the only one that had to be a rather specific size was the one on the far right in the front. I wanted a place to put bills that wasn’t out of the way so I’d forget them but kept them from sitting on the counter. So I figure out my length and then made a divider across the width of the drawer.
The hardest part of this project (for me, anyway), is making sure to measure the same on both side so you don’t end up with a divider that’s all caddywompus. So I measured on each side and make a mark in the middle of where I wanted the metal bracket. There are four barbs on the bottom of each bracket, so I just made sure those were lined up on the measurement mark. The speed square (if you don’t have one of these, get one. I use it all the time and it’s just a chunk of plastic so it’s cheap) came in very handy to make sure I was drawing straight lines when I was marking my measurements as well as marking my cuts.
When it comes time to pound in your brackets, it only takes a few taps with a hammer or rubber mallet. Make sure you use a scrap piece of the balsa wood as a tapping block or you will disfigure the bracket. Here you can see the scrap piece I used to tap in the bracket.
From there, you just keep dividing compartments as required. I did the front half of the drawer first and then did the back half. I had to take the dividers in and out several times to measure for adjoining compartments and install the brackets, but so long as you work a section at a time, it’s really easy.
And here’s what it looked like when it was all installed (and before all the junk was back in it). I just put some shelf liner under it and slid the entire thing in the drawer.
The I used was 4 inches tall, which is a nice depth for the junk drawer because it keeps stuff from migrating from one compartment to another. I used the same system in the silverware drawer, but I cut down the wood to only be about 2.5 inches tall so it would be easier to reach in and grab utensils. We used the table saw for that, but again, a jig saw or something like that would also work fine.
I love how this DIY solution maximizing every inch of the drawer and that I could suit it specifically to our needs. Really, the most time consuming part was loading all the stuff back in and filtering out all of the things that shouldn’t have been in the junk drawer in the first place
So … what’s the state of your junk drawer?


13 Responses
I SO need to do this! Thanks for sharing this great diy idea!
You are not alone in dawdling over decorating for Christmas. I refuse to do anything before Dec 1st and then I do over a week or so. Thirty days of Christmas is more than enough for me.
My junk drawers aren't too bad, but there is definitely room for improvement. I really like those Lee Valley compartment dividers! I think I will just have to show hubby what you have done. I think it's great!
Don't worry, Erin, you're not alone in this non-decorating thing. I am struggling with getting things out before guests arrive this weekend – not getting it all out, just some touches. I'm sick of all the commercials and DIYs and food and……
My junk drawer is a mess – you've got me thinking I may have to do something about it – I used the Ikea bamboo ones before and they work nicely – but your Lee Valley idea is terrific because it works for any drawer. But it will have to wait for January – I've got to get my Santa hat on!!
When I first saw your drawer with the frame, I thought that losing half an inch of length and width was too bad, but then I cleaned our silverware drawer—and realized that if you cannot remove the dividers, you have little hope of getting all the crumbs out, not to mention never being able to wash the liner.
Now that you've lived with this system for two years, how is it working? Should the wood have been finished somehow—spoon oil or paint, maybe?
I never did finish the wood and it looks exactly as it did the day we installed it. I still love it. I will say the junk drawer is not quite as organized as it once was, but I blame that on the users, not the system.
I have been looking for silverware I like for a very long time. I love yours, where did you buy your silverware?
Isn't it hard to find flatware that you really like? Mine is from Crate and Barrel, and I think it may have been called Bolero. Unfortunately, they discontinued it a few years ago (mine is almost 12 years old). However, I think I saw something similar there not too long ago so you may want to check them out.
Great DIY project. EXACTLY what I need. I looked at the link to Lee Valley – are these the same drawer dividers you used? I assumed you tapped the barbs into the balsa wood gingerly so as not to break it. http://www.leevalley.com/US/hardware/page.aspx?p=40168&cat=3,43722,43743 Thank you! Looking forward to implementing in my silverware & junk drawers.
I have several drawers all over the house that seriously need this treatment. Definitely saving this for later! I definitely like the look of this more than just glueing the ends in place. Looks more.. stable. =) Thank you for sharing!!
I’m doing this. Just a tip though, I found the Metal Drawer Dividers cheaper at HardwareTree.com. Shipping was cheaper too. Thanks for the idea.
Where did you purchase the brackets?