Normally I am not one to rush through projects. I really believe in the adage that anything worth doing is worth doing well. But I recently threw that aside and just went for it on a little building project for the garden.
I got a couple of goji berry vines recently and I am so excited for them. Not just because I’m anxious to try goji berries (which are hailed as the new antioxidant superfood) because they are said to be delicious, but also because the photos I’ve seen of the plants are gorgeous.
When I read that they can grow to 10 feet tall, I knew I’d need a sturdy structure to support them and I’m always looking for fun garden structures. Have you priced sturdy garden structures lately? Egads, they are pricy. And when I started looking at wooden obelisks (also search for tuteurs, as the two words seem to be used interchangeably) on the Internet I realized that they didn’t look too complicated.
So that’s how I ended up building an obelisk/tuteur in half an afternoon. Let me preface this by saying that unless you are a very proficient woodworker, this should take you much longer than it took me. But the fact of the matter is that this is the craziest time of year. Work is nuts, the garden demands more time than I can fathom (I would be in good shape if I could take a week off of work and garden 14 hours every one of those days, so dividing that up into nights and weekends equals a lot of days) and, as you know, I have more than a few other summer hobbies I like to do. And, as usual, there is an underlying pressure to get it all done so I can hurry up and enjoy summer.
I found
this great tutorial for building an obelisk. The directions aren’t lengthy, but they aren’t hard to figure out. So here’s where I tell you to FOLLOW THE DIRECTIONS. Because I didn’t. Even though they were there, plain as day, spelled out in English and everything. But oh no … I had to improvise. Do not improvise on this project.
You’ll notice that this great blogger was extremely precise about how to cut the wood. In many cases it involves cutting with a bevel and an angle (the bevel is tipping your saw blade one direction and the angle is sliding the cutting surface to a certain degree), flipping the wood over and then cutting again. But we have a lousy saw and no table extension for it, so it is really hard to cut long pieces of wood without a second person helping to hold them. I actually put one leg up on the wall to support the end of the wood to make some of the cuts. And I did not wear eye protection. It is a wonder that I still have 10 fingers and two eyes. So don’t do that. Please. I don’t have enough readers to start losing them to eye and finger injuries.
Anyway, I ended up flipping the boards any which way was easier to cut, which meant I totally screwed up the cuts, but I didn’t realize it until it came time to put the frames together.
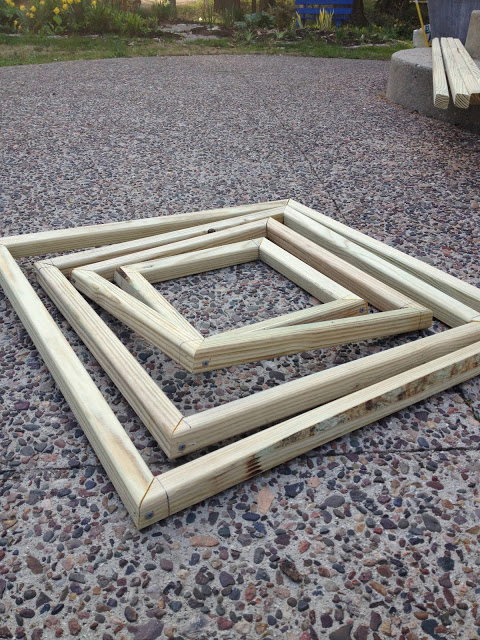 |
| Yep, not supposed to look like that. |
If I had been in “Anything worth doing is worth doing well” mode, I would have stopped, bought more wood and started over, actually following the directions. But I was in “Dammit, this has to get done today” mode. So I just screwed it together as best I could. You can see that it wasn’t right. These should be laying nice and flat and square.
You definitely need a second person when it comes to assembling the whole thing and even then it’s a bit of challenge. We found it to be helpful to attach the bottom frame (the biggest one) first and then attach the top piece. The rest of the frames didn’t exactly land where they were supposed to according to the measurements, but they look pretty well spaced to me. For the frames that were completely out of whack because of my miscuts, I literally jumped on them a few times to flatten them out and then we bent them when we were screwing them on the legs to make them sort of level.
Ok, this all sounds like super shoddy work, and I’ll admit that it mostly was. But honestly, this isn’t one of those things that is meant to be appreciated up close and hopefully it will be covered in plants before too long. Also, wood doesn’t tend to last too long in the garden so it’s not like this a permanent structure. Do I sound like I’m justifying my less-than-stellar workmanship? Yeah, I am.
Anyway, we got the whole thing together and honestly I didn’t think it looked too bad. I had a really hard time figuring out what color to paint it though. I wanted to stick with spray paint because, again, this was about fast, and spray paint is so much faster than a brush. That meant I was limited to spray paint colors (you can of course, seek out special spray paint at Michael’s or even have spray paint matched to any paint color through www.myperfectcolor.com, but those are expensive options). I would have loved a light orange, but the oranges I were finding were a bit hunter orange for my taste. I actually bought a lovely teal and then returned it. In the end I settled on Key Lime green which turned out to be neon green. Of course I spray-primed it first, but I didn’t bother sanding it or filling any screw holes or anything.
Also, did I mention that this is a BIG obelisk? And it looks even bigger when I stuck it in a raised bed. Mr. Much More Patient has mentioned that we may need to put a light on top of it to warn passing aircraft. There is a chance he is exaggerating.
In any case, yes it’s big. But hopefully it will soon be covered in lush green leaves and not be so imposing. Time will tell.


5 Responses
Love the Key Lime colour!!! it's going to look awesome when the vine fills in – the light green will be a super contrast to the leaves. Well done, my friend. Don't know if this kind of project is in my bag of talents.
LOL, well I think it looks great. Can't wait to see the plants all filled in
Since recently becoming a home & 'real garden' owner, I've discovered that an "It'll work" attitude is actually less disastrous when it comes to these small projects than I had imagined. (Easier on the wallet too.) Your project looks great, I like the color! Don't think you'll have a problem with it collapsing, and it might even last a year or two. Congrats!
I made this last year and it came out all wonky too. I have already ripped it apart and have done something else with the wood. Gotta try again this year!
Not too shoddy!!!! Looks neon great and I really enjoyed your writing. I’m making one today.
I like being your fan.
Warmest regards
Jennie