I’m a bit obsessed with window boxes these days. I think they are so charming and can cure a multitude of house exterior sins. If I were selling a house, I think a window box would be right up there on the must-do list for curb appeal.
So, you might wonder, why am I just now putting a window box on my own house? I’ll be honest, I never even thought of it before. But then I was studying this drawing of the house (showing an exterior elevation of the house for some work we hope to do later in summer) and I was incredibly bothered by the fact that one of the windows is shorter than the others. It’s the kitchen window behind the sink, so it makes sense that it’s not as tall as the others, but from the outside it just looks wrong. Perfect spot for a window box! Once it’s installed and planted, I don’t think you’ll notice the shortness of it nearly as much. Plus, our house’s all-white exterior is a bit, um, boring, so a little color would go a long way.

I love looking for container inspiration, so I’ve been enjoying my hunt for great window box ideas. And even though I’ve never planted a window box, I know what I like and I can definitely tell what’s not quite right, just from studying photos of them. So here are a few design concepts to keep in mind if you’re going to be planting a window box.
1. The more window boxes you have, the simpler the design should be. Window boxes are great but they are, as Tim Gunn would say, “a lot of look.” If there are too many colors or textures going on, your house is going to look like the little shop of horrors. Keep your plant choices to one, maybe two or three at an absolute maximum (and then only if they relate closely to each other, such as a light pink and a dark pink petunia) and then plant every box the same. I know it’s hard to pick just a few plants when there are so many great ones around, but pick one or two this year then do something totally different next year. Just don’t do it all at the same time.

2. The higher your window boxes are, the simpler, and “bigger” the look should be. Euphorbia ‘Diamond Frost’ is a great container plant, but its fine texture will be completely lost in a window box mounted 15 feet in the air. Better to stick with a big, bold petunia or geranium.


3. Thriller, filler, spiller still applies … sort of. As with any container planting, you want to mix things up (unless you are going for a very contemporary look, in which case a line of plants all the same height—grasses grown in almost a hedge look, for example—might look very cool). The tallest plant should be in the middle and things should gradually decrease in size from there. Be careful, though, to to keep scale in mind. A very long window box with Papyrus ‘King Tut’ planted in the middle would look very odd (and make opening the windows very difficult.) Also, spillers should be consistent throughout the box. I saw some with spillers just on the ends and it looked quite strange. And as long as we’re talking about spillers …


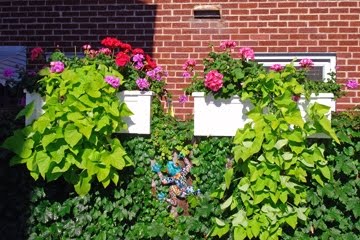
4. Move away from the sweet potato vine. ‘Marguerite’ is a hungry girl. She will eat all the other plants in your container for lunch. Sure, she’ll look great for a few weeks, but then she’ll get greedy. What you’ll end up with is a giant blob of lime green and nothing else. Judging from the photos I found, she seems to be even more aggressive in window boxes. A better alternative is one of the new sweet potato vines that are supposed to be much more well-mannered, or Lysimachia nummularia ‘Aurea’ (creepy jenny), which still offers that nice color.
5. Repetition, repetition, repetition. (See how I repeated that?) Pick a few plants and repeat them in your design. Whereas a patio container will look great with clumps of color, if you do that in a window box it will look off balance. Symmetry is a great thing in window boxes.


6. Keep the conditions in mind. You can push the limits on a lot of container plants. For instance, a lot of times you can put a plant that’s really interested in part sun in a very sunny location in container as long as you are committed to watering a lot. You can also shade some plants in a container with other, taller, plants growing next to them. Or, you can rotate a container to give a plant that would otherwise be shaded a bit more light from time to time. But window boxes don’t move and they live in some pretty harsh conditions. Imagine how windy it can be on the top floor of house. Also, since they are against the side of the house, a northern exposure is going to get basically nothing in the way of light, whereas a container just a few feet from the house would at least get some light. My window box is going to be on the south side of the house. The south side of a very reflective white house. There is a very real possibility that I may fry all the plants to death. I plant to counteract this by using self-watering reservoirs in the box as well as making sure I pick tough plants that love sun.

7. Do what you love. I feel that containers are maybe the most personal part of a garden. More care is spent picking the plants for a container than almost any other part of the garden. Each is placed purposefully in a container and because they need so much attention, they are the plants we are most likely to study every day. So if any of all of those guidelines above don’t fit with what you want to put in a window box, then ignore them! If it looks good to you, that’s all that matters.
And here’s what I love. These two window box plantings cover just about everything you’ve read above and another thing I haven’t even addressed, which is changing out your plantings seasonally. Both of these are by Deborah Silver and I think they might be the best window boxes I’ve ever seen. Please check out her portfolio of amazing work or her awesome blog Dirt Simple.

See what I mean about repetition? It’s particularly important in a long series of window boxes like these. The height is perfect and there is the perfect amount of spillers.

And if you thought I loved that design above, I almost can’t describe my love for this planting, full of ornamental kale and cabbage (Brassicas). I WANT this window box.
Photos from Freefoto.com, Hooks & Lattice, DeWald Gardens and Dirt Simple